63. Fans
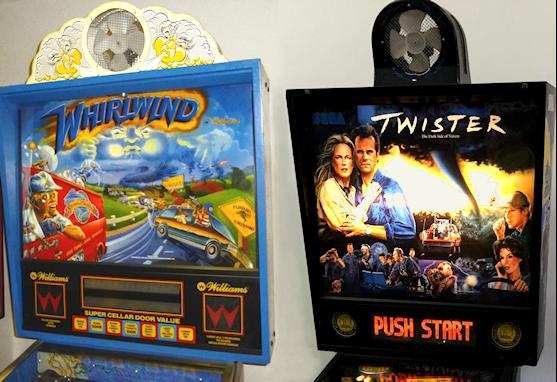
At least two real pinball machines featured fans mounted on top of the
backbox: Whirlwind (Williams, 1990), Twister (Sega,
1996). Two titles might seem like an awfully skimpy reason to include
a fan on a virtual cab, yet this has become one of the more popular
toys, and I'd highly recommend it. The reason? Fans are uniquely
tactile. They add a completely new sensory effect to the playing
experience.
As you'd expect, the DOF database replicates the authentic fan action
in Whirlwind and Twister. Including a fan on your cab
will make those games that much closer to the original. Now, if that
were all the use you'd get out of a fan, it probably wouldn't be worth
the trouble unless you had a rather fanatical devotion to one of those
specific games. Fortunately, that's far from the only use your fan
will see. The DOF database is programmed to trigger the fan in dozens
of games - 41 as of this writing.
I really like the fan effect and the way DOF uses it, and I think most
pin cab builders who've included them would agree. I rank this toy
near the top of my priority list. It's a lot like the shaker motor in
terms of its effect on game play: it just makes the game feel more
exciting and immersive.
Auto/boat fans
The easiest way to add a fan is to use an off-the-shelf fan made for
use in cars or boats. These can be found in the right size range to
fit nicely on top of a backbox (about 6" diameter), and anything made
for a car or boat will run on 12V DC, which means you can power it
from a secondary ATX power supply. Search on Amazon for "car boat
fan" to find options.
DIY
For my own cabinet, I wanted something that looked more custom, to fit
with my cab's artwork, analogous to how Whirlwind's fan
enclosure is shaped like a storm cloud. I started with a bare fan
assembly, just the fan blade and motor, and built my own custom
3D-printed plastic enclosure around it.
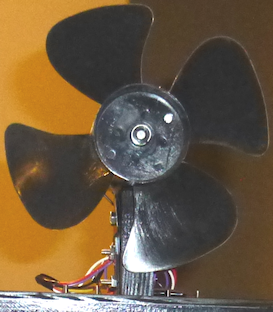

My DIY fan assembly. A run-of-the-mill 12VDC motor with a 1/4" shaft,
with a 6" plastic fan blade press-fitted onto the shaft, mounted on a
makeshift wood and sheet metal bracket. The blade is the same one that
Williams used for Whirlwind, which happens to be an OEM part
for microwave ovens (!).
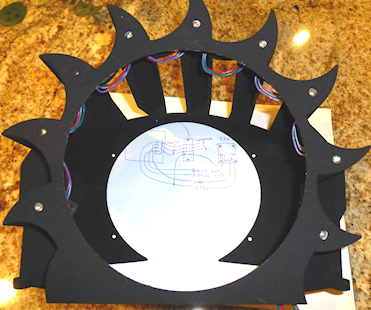
My 3D-printed fan enclosure (in the wiring stages, installing
LEDs around the perimeter).
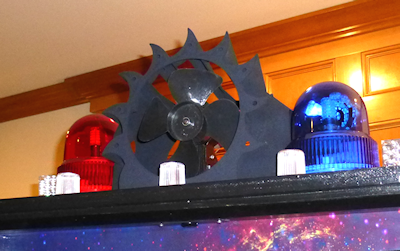
The fully assembled Pinscape fan.
If you want to go the DIY route, there are a couple of ways to get a
bare fan assembly to use as the core. One is to buy a car/boat fan
like above and remove its case. Another is to build your own entirely
DIY fan assembly from parts.
The completely DIY approach is probably easier. It's certainly more
predictable; you never know with a pre-assembled fan if it'll be
possible to remove the case without destroying the whole thing. To
build a fan from parts, you really only need two pieces, both of
which are easy to find:
- A 12V DC motor with a 1/4" shaft. You don't need anything particularly special; most 12V motors will have plenty of power to run a fan. Look on eBay, Amazon, or robotics hobby vendors.
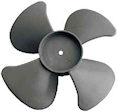 A blade. The
original Whirlwind fan, amusingly enough, was actually an OEM part for
microwave ovens (Thorgren model number 6C2504C1). It's plastic, has
four blades, and a 1/4" bore, like the one pictured at right. You
might be able to find that exact part on eBay or appliance parts
vendors, but there's really no need unless you have a special fondness
for Whirlwind in particular. You can find any number of
similar appliance fan blades on eBay by searching for 6" fan
blade. Look for blades with a 1/4" bore, as these will easily
press-fit onto a 1/4" motor shaft.
A blade. The
original Whirlwind fan, amusingly enough, was actually an OEM part for
microwave ovens (Thorgren model number 6C2504C1). It's plastic, has
four blades, and a 1/4" bore, like the one pictured at right. You
might be able to find that exact part on eBay or appliance parts
vendors, but there's really no need unless you have a special fondness
for Whirlwind in particular. You can find any number of
similar appliance fan blades on eBay by searching for 6" fan
blade. Look for blades with a 1/4" bore, as these will easily
press-fit onto a 1/4" motor shaft.
You'll also need to build a bracket to attach the motor to the
backbox. You should be able to improvise something if you have some
minimal woodworking skills. (You'd need to build this part even if
you're re-purposing an auto/boat fan, so I didn't count it in the "two
pieces" I said you needed for a fully DIY fan.)
In-cab blowers
A few pin cab builders have built fans into the cabinet body rather
than putting it on the backbox. One technique mentioned on the forums
was to use an air duct to to route air from a small fan through an
opening in the coin door. (One potential opening to use for this: the
dollar acceptor slot. Newer coin doors made for the US market tend to
include a large square opening intended for dollar bill acceptors.)
Here's a particularly amusing take on this theme:
Heavily modified whirlwind topper fan
(Pinside pinball forums)
I personally like the effect of the fan blowing at you from the
backbox, but at least one person who built the coin door version
commented on the surprise value of the sneaky placement.
Wiring a fan (DC voltage)
Assuming you're using a 12V DC fan or motor, you can power the
fan from the +12V terminal (yellow wire) of your secondary ATX
power supply. See Power Supplies for Feedback.
Connecting the fan is just like any other feedback device:
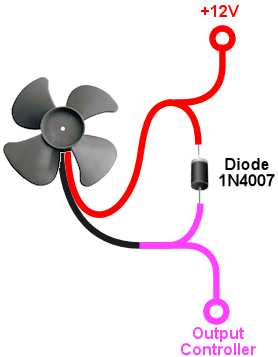
Connect one terminal of the fan motor to the +12V from your
secondary ATX power supply. Connect the other terminal to an
available port on your output controller.
The diode is required to protect your output controller and
computer electronics from interference from the magnetic field
generated by the motor. See Coil Diodes.
If you're using an LedWiz, don't connect the fan directly to the
LedWiz. Fans use too much power for an LedWiz, so you'll need some
kind of booster circuit. If you're using the Pinscape expansion
boards, you can connect the fan directly to any MOSFET Power
Board port.
Electrical interference
Be sure to use a diode with the motor, as shown above. If you still
get electrical interference when it runs (for example, USB devices
randomly disconnect, or you see random keyboard input on the PC), you
might need to add more filtering. The two-inductor filter described
for the shaker should work equally well with a fan motor. See
"Electrical Interference" in
Shaker motors for the wiring and
parts details.
Wiring a fan (AC voltage)
If you're using an AC-powered fan, don't connect it directly to
an LedWiz, Pinscape controller, or any other solid-state controller.
You'll need a relay for this instead. If you're using a Sainsmart
relay board, the outputs on those are in fact relays, so you can
connect an AC device directly. For LedWiz and Pinscape, you'll need
to add a relay to the circuit: your output controller will control the
relay coil, and the relay will control the AC motor. See
"AC devices" in Feedback Device Wiring
for the wiring plan.
DOF Setup
In the DOF Config Tool, go to the
Port Assignments page. Find the port number where you wired the
fan. Assign it to "Fan".
At the right side of the page, you'll also find a section labeled
"Fan" that lets you set the intensity range. If you're using a
PWM-capable controller (e.g., an LedWiz or a Pinscape power board),
this lets you set the range of power that DOF uses when the fan
runs. The intensity values are on a 1-48 scale, where 48 is the
highest power. The default settings use the full available range.
If you find that the fan is too powerful (runs too fast) when
DOF activates it during game play, you can reduce the maximum
intensity setting to slow it down. Similarly, if the fan seems
too weak some of the time, you can raise the minimum setting.
