80. Connectors
One of my "design rules" when I built my own cab was that everything
should be modular: pieces should be self-contained, and it should be
easy to take anything out for servicing or replacement without major
surgery, and just as easy to put it back. In the case of the
electronics, this meant that nothing should be "hard-wired" into the
cabinet. I should never have to cut a wire or unsolder anything just
to remove an electronic device. The way to achieve that is to make
sure all of the connections in the wiring are made with modular
connectors that can be plugged and unplugged, just like a power plug
in a wall outlet.
When I started planning my cab, then, I knew I wanted to use some kind
of pluggable connectors throughout, but I didn't have enough
electronics experience to know exactly what to buy. I looked to see
how other cab builders handled this, and found that there aren't any
widely agreed "best practices" in this area. Looking at Mouser to see
what's available only muddied the waters further, because they have
literally thousands of options for connectors. Worse still, many of
the available connectors are themselves fairly complex systems, where
you have to assemble plugs and sockets out of multiple. It's hard to
know where to begin when faced with the vast array of available
options.
That's why I'm devoting a whole chapter to this seemingly trivial
subject. In the course of building my own cab, I managed to narrow
the huge range of available connector options to a few versatile types
that have served me well. The Pinscape parts lists use some of these
directly, so some of the information we'll cover is simply to help you
recognize and use the parts required for the Pinscape components.
We'll also look at some of my go-to connectors for other miscellaneous
connections throughout the cabinet, to save you the trouble of
repeating all that research.
0.1" pin headers

 This is one of the most ubiquitous connectors that you'll see in hobbyist
electronics, and really electronics in general. A pin header is basically
just a row of connector pins sticking up out of a circuit board, to
provide a connection point to the outside world for a group of circuits.
You plug into the pin headers with matching connectors. In most
cases, the connector attaches to a ribbon cable or hookup wires that
lead off to whatever is meant to be connected to the board. This
lets you plug and unplug the whole collection of circuits represented
by the header with a single connector.
Pin headers can be out in the open, as in the top two examples
at right, or can be enclosed in a plastic "shroud", like the bottom
example at right. The pin spacing is the same either way; the
shroud is there primarily to make sure you can't orient the
mating plug the wrong way when plugging it in. The little slot
you can see in the picture of the shroud at right lines up with
bump on the connector, so if you try to insert the connector
backwards, the bump hits the other side of the shroud and prevents
you from inserting it.
Pin headers and the matching connectors are described in more
detail (with product links and installation instructions) in
0.1" Pin Headers.
PC disk power connectors
An ATX power supply comes with an array of power cables with different
connectors on the ends. If you want to use an ATX supply to power
feedback devices or audio equipment, the easiest way to tap into its
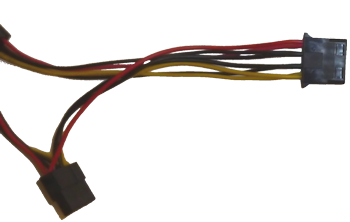
power outputs is via the disk connectors. These are the four-pin female
connectors that look like this:

The four pins are connected to color-coded wires. You can identify
the pins by the wire colors:
| Wire Color | Voltage |
|---|---|
| Black | 0V (Ground) |
| Red | +5V |
| Yellow | +12V |
The easiest way to connect to these is to snip the connector off the
end of one of the cables, strip the wires, and solder your other wires
directly to the ends, or connect them through screw-terminal blocks.
But that's not great because it permanently modifies the power supply.
A better way is build your own mating connectors and just plug
into them, the way you'd plug in a PC disk. It's pretty easy to
build the matching connectors. Here are the parts you need:
- TE/AMP 1-480426-0 4-pin housing
- TE/AMP 60620-1 male crimp pins, quantity 4 per housing
Those are crimp-pin housings, so see Crimp Pins for instructions
on how to assemble them.
Also see Power Supplies for Feedback for more on using ATX power supplies
for feedback device power.
PC motherboard "front panel" connectors
Most modern PC motherboards feature a standardized connector for the
miscellaneous case buttons and indicator lights - the soft on/off
button, reset button, power light, disk activity light, etc. This is
known as the F_PANEL or Front Panel connector, and is usually labeled
as such on the motherboard.
Intel defined a standard layout for this connector, so that motherboards
and cases can easily inter-operate without proprietary connectors.
It happens to use the standard 0.1" pin header layout, with a 10-pin
(dual-row, 2x5 pins) header.
You can plug into these with one of the 0.1" crimp pin housings
described above.
See Power Switching for more on the front panel connector
and how to set up PC-controlled power switching in your pin cab.
Molex wire-to-wire connectors
For any parts that you want to be able to easily remove from the
cabinet, I always recommend using plug-in connectors. The pin headers
described above are one type of plug-in connector, but those are
mostly suitable for circuit boards. What about cases where you want
to create a pluggable connection for something that's not a circuit
board, like, say, your shaker motor?
For those connections, I like using a "wire-to-wire" connector. This
is what they call any connector used to join two wire runs. A
familiar household example is the connector at the end of an extension
cord: it's there so that you can plug one wire (the power cord of an
appliance) into another wire (the extension cord itself). Inside a
pin cab, there are lots of situations where similar wire-to-wire plugs
can be helpful.
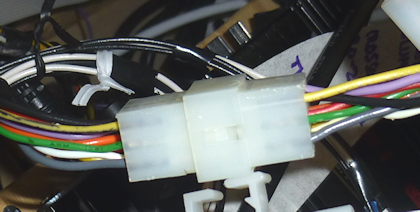
There are lots of options for these. In my pin cab, I made lots of
use of a couple of connector types made by Molex: their Standard .062"
and Standard .093" systems. I was familiar with these because they're
the connectors Williams used for similar purposes in their real
machines for many years. The .062" and .093" systems are similar; the
difference is the pin size, with the larger .093" pins having a higher
power capacity. Both systems use plastic crimp-pin housings that come
in a range of pin counts, with keyed connectors that only fit one way.
This makes them pretty foolproof: the keying ensures that you can't
plug a particular connector in the wrong way, and the different pin
counts let you use a variety of different connectors in your cab to
prevent mistaking one connector for another. You can't plug a 9-pin
plug into a 12-pin socket.


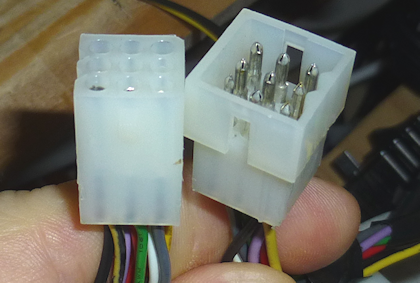
Molex .062" 9-pin connector, plugged (top) and unplugged.
These systems are available as separate parts (male and female
housings and crimp pins/sockets), but the easier way to buy them is
in kits. You can find the kits on Amazon as well as Mouser. Here's
a Mouser search that should work:
(That's a search for Connectors > Pin & Socket connectors, product=Kits.)
Amazon searches for "Molex .062 kit" and "Molex .093 kit" shoudl also turn
up similar results.
These are crimp-pin systems, so see Crimp Pins for instructions
on assembling them.
Terminal blocks
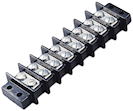
 An easy way to make point-to-point connections without soldering is with a screw-terminal
block - a plastic block with a set of paired screw terminals, like the
one pictured at right. Screw terminals are easy to connect and can be
removed or changed at any time.
To make a connection between two wires with a screw terminal:
- Strip 1/4" or so of insulation from the end of each wire
- Pick a pair of connected screws on the terminal block
- Unscrew the screws a few turns (don't unscrew them completely)
- Wrap one of the wires around one of the screws, and tighten the screw to secure the wire
- Wrap the other wire around the other screw and tighten
Terminal blocks like this can be easily found on Amazon and eBay. I'd
recommend getting the type that comes with plastic cover, which protects
the terminals against accidental contact with other wires or metal parts.
Screw terminals are good for wiring that's more or less permanently
installed in the cabinet. I wouldn't use screw terminals for any
wiring that attaches to parts that you want to be able to remove
frequently, because it's a bit of a pain to disconnect and reconnect
the wires. It's better to use pluggable connectors, such as one the
Molex wire-to-wire connectors mentioned above, for anything that you
might have to remove more than rarely. For example, any parts that
you have to remove to access other parts should be easily pluggable.