84. Fuses
If you're including any feedback devices in your system, it's a good
idea to include a fuse in each output circuit.
A fuse's job is to cut off power if too much current flows through a
circuit. In your house wiring, the fuses and/or circuit breakers are
there to prevent fires, by ensuring that your appliances don't try to
force too much current through the wiring inside the walls. Wires
that carry excessive current will overheat, and this obviously would
be catastrophic for wiring inside walls.
Fuses help with fire protection in a pin cab context as well, but
that's not usually our primary concern, because most everything in a
pin cab draws its power from a DC power supply with its own built-in
overload protection. The thing we're more concerned about in a pin
cab is protecting our controller electronics against overload. Most
controller boards have relatively low power-handling limits, typically
well below the overload level of the power supplies, so it's good
practice to use fuses to protect controller circuits from overload.
This also has the side effect of giving us some additional protection
against fire.
Are fuses required?
Fuses aren't absolutely required, but most pin cab builders consider
them worthwhile. It comes down to a simple cost calculation: a
50-cent fuse might save a $50 circuit board if an output overloads.
I'd rather replace the 50-cent fuse than the $50 circuit board.
On the other hand, if you have a decked-out cab with twenty or thirty
devices, the cost of parts for all of those fuses (taking into account
the fuse holders and the additional wiring) might add up to more than
the cost of the board you're protecting. So rather than fusing every
output, you might prioritize the most "dangerous" outputs:
- Motors (including shakers, gear motors, and fans): very high priority. DC motors are particularly likely to cause random overloads because a motor's current draw increases with mechanical load. It's possible for a motor that's been working normally for a long time to suddenly draw a ton of current due to a mechanical issue, such as something jamming the motor.
- Solenoids: high priority. Solenoids can cause surges of current when first energized, and like motors, their current draw is somewhat unpredictable because it can depend on mechanical conditions.
- Contactors, relays: lower priority. These are basically solenoids at heart, but most have relatively low power needs and are self-contained enough that they're not likely to be affected by the mechanical environment.
- LEDs and incandescent lamps: low priority. These draw predictable current levels, and they're unlikely to misbehave at random. I'd skip fuses for these unless you're being very rigorous about fusing every last output.
Note that there's a secondary risk that applies to all of your output
devices: wires that get crossed accidentally and create
short-circuits. This can happen due to wiring errors, dropped
screwdrivers, hex nuts that come loose and fall onto exposed contact
points, etc. This isn't a purely hypothetical risk; these things
actually do happen from time to time, judging by reports I've seen on
the forums. This might be reason enough to use fuses for every
feedback device.
Fuse wiring overview
We'll start with a diagram summarizing which devices need fuses, and
where the fuses fit into the wiring. To make the diagram easier to
read, we only show the wire segments where fuses are involved (so
don't base your whole machine's wiring on this!).
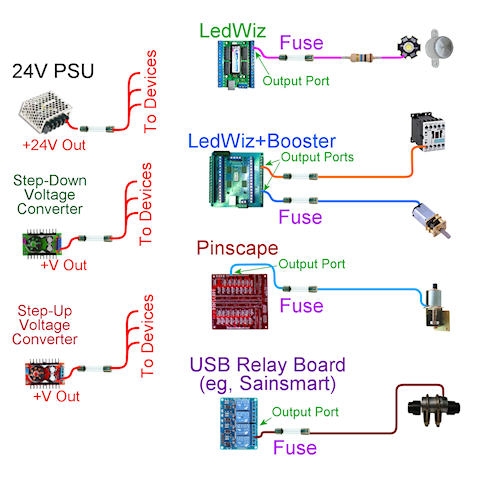
Here are some key points to note:
- For feedback devices:
- Each feedback device (contactor, flasher, motor, etc) should have its own fuse
- Use fuses regardless of which output controller you're using
- Wire the fuse between the output controller port and the device
- Position the fuse close to the output controller port
- For non-ATX power supplies, and step-up/step-down
voltage converters:
- Use one fuse for the whole power supply or converter
- Connect it to the positive voltage output (+V out)
- Use the fuse as the common point of connection to all of the devices the PSU/converter powers
- Place the fuse physically close to the PSU/converter
- For ATX power supplies (standard PC power supplies):
- Fuses generally aren't needed for PC ATX-type power supplies, because these usually have built-in overload protection
- The built-in protection in an ATX supply is typically provided by a thermal "resettable fuse" that only cuts power temporarily, and automatically resets itself after the overheated parts cool off
Fuse selection quick reference
Here are some recommendations for fuses for the most common pin cab devices. For each device, we list the electrical specs you should look for, and provide an example of a fuse that meets the requirements. You don't have to use that exact fuse, just one that meets the specs listed. We'll explain what the specs mean and how we came up with them later in the chapter.Fuses and ratings marked with asterisks (*) are examples only, because they're for component type that vary so much that no one fuse will be right for every example.Device Fuse Amps Fuse Volts Speed 
LedWiz output port (no boosters)0.5A ≥50VDC** Fast Bel Fuse 2JQ 500-R

Zeb's LedWiz booster board output port4A ≥50VDC** Fast Bel Fuse 2JQ 4-R

Pinscape power board output port5A ≥50VDC** Normal Bel Fuse 2JQ 5-R

USB relay board (e.g., Sainsmart) output port5A* (Use Max Amps for relay switch) ≥50VDC** Normal Bel Fuse 2JQ 5-R *

Replay knocker & other pinball coils1.5A ≥50VDC** Slow-blow Bel Fuse 3JS 1.5-R TR 
OEM/eBay/generic power supply10A* (Use PSU's Max Output Amps) ≥PSU output volts DC Normal Littelfuse 0AGC010.V *

Step-up/Step-down DC-to-DC voltage converter5A* (Use converter's Max Output Amps) ≥Converter output volts DC Normal Bel Fuse 2JQ 5-R *
* means that this is an example only, because this type of equipment varies. Check the actual Max Amps ratings on your equipment in these cases and substitute appropriate fuses if necessary.** I used a blanket 50VDC recommendation for the sake of simplicity. This is high enough for anything commonly used in a pin cab, including knocker coils and other real pinball coils. It's actually difficult to find fuses rated for such high DC voltage, though; it's much easier to find 32VDC fuses, since that rating is used for virtually all automotive fuses. You can safely use 32VDC-rated fuses in any circuit where your actual power supply voltage is 32VDC or below.How to choose a fuse
Fuses aren't one-size-fits-all. You have to choose fuses according to the electrical specs of the circuits they're protecting. Each circuit has its own requirements, so you might need different fuses for different circuits.Current (Amps). This is the most important number when choosing a fuse. The whole purpose of a fuse is to limit the amount of current that's allowed to flow in a circuit, so choose a fuse for each circuit according to the maximum safe current for the components in the circuit.A fuse's current rating tells you maximum the fuse will allow without blowing. For example, a fuse rated for 5A will allow up to 5A to flow, and should never blow as long as the current stays at or below 5A. If the current goes above the rated level, the fuse will blow - eventually. Not necessarily immediately. If the current is only a little above the limit, the fuse might not blow for minutes or even hours. The higher the current goes above the limit, the faster the fuse will blow.In a pin cab, most of our fuses are for protecting delicate electronics, like LedWiz outputs. These can be damaged very quickly by overloads, so we don't want the fuse to think about it for too long if the current exceeds the safe level for the device. A rule of thumb in these cases is to choose a fuse rated for about 75% of the maximum current for the device. For example, LedWiz outputs can be damaged above 500mA, so you might look for a fuse rated at around 375mA.Voltage. The voltage rating on a fuse is a maximum. You don't have to match your circuit's voltage; you just have to make sure the fuse is rated for at least the circuit voltage. The voltage rating has nothing to do with the current limit, so it's fine to use a fuse with a higher voltage than your circuit uses. For example, a 125VDC fuse is fine to use in a 24VDC circuit.You should select fuses with DC voltage ratings, since pin cab circuits are almost all DC. Many fuses are only rated for AC voltages. You might think this doesn't matter, but the fuse manufacturers warn that DC ratings are more stringent than AC, so a fuse that hasn't been rated for DC use might not properly stop current flow if used in a DC circuit. All of the fuses linked in this chapter are DC-rated.Speed. Fuses come in two main speed classes: normal fuses that act quickly, and "slow-blow" fuses that act on a time delay. Slow-blow fuses are designed to withstand brief current overloads, for a period of several seconds to a couple of minutes, depending on how big an overload occurs. Normal fuses, in contrast, act quickly when the current goes over the limit.Some manufacturers also make extra-fast fuses that operate even more quickly than the "normal" type, to protect especially sensitive circuits that can't tolerate even brief current surges.The terminology for "fast" and "slow" can be confusing when shopping, because the terms aren't always used consistently. Some sellers use "fast" to refer to the extra-fast type, whereas others simply use "fast" for everything that's not "slow". When extra-fast fuses are in the mix, sellers will usually also offer "medium" or "normal" fuses, which refer to the regular fast-blow type, as opposed to extra-fast. If a site you're shopping at only offers "fast" and "slow" categories, you can probably assume that the "fast" ones are only the normally fast type.Which speed class is best for a pin cab? It depends on the type of circuit you're protecting. For most circuits, normal fuses (not time-delayed and not extra-fast) will work well. You might consider extra-fast fuses in a few situations where small IC chips are part of the power circuit, specifically for LedWiz controllers, since the small driver chips on those devices can fail quickly when overloaded. Slow-blow fuses are useful for circuits driving pinball solenoids, such as replay knockers or chimes. Pinball coils are specifically designed to operate at intermittent "overload" levels, which is exactly what slow-blow fuses are good for, since they only act when an overload is sustained for an extended time period. We'll offer some advice on selecting slow-blow fuses for solenoid circuits in the section on coils below.What if a fuse keeps blowing?
If a fuse in your cab blows repeatedly in normal use, one of two things could be going on. One possibility is that something's wrong with the circuit that's causing an intermittent overload. The other is that you just need a fuse with a slightly higher limit.To debug this kind of situation, I'd always start by assuming the worst - that there's a fault in the circuit that's causing a real overload situation. Carefully check the circuit for potential problems. If the fuse blows seemingly at random, check for the sorts of things that can cause intermittent problems, such as loose wires. If you can't find anything wrong, the next thing I'd do is double-check the current load of the circuit to make sure it's within the expected limits. For example, if this is a solenoid feedback device, use a multimeter to check the current drawn by the solenoid, and make sure that it's below the limit for the output controller port. If the device draws more current by design than the output controller allows, you'll have to either get a beefier output controller or substitute a smaller solenoid.Assuming that you don't find anything wrong with the circuit, and that everything is within the expected limits, you might simply have to use a fuse with a slightly higher rating. For an inductive device like a motor or solenoid, if you're currently using a normal fuse, try switching to a slow-blow fuse with the same current rating. If you're already using a slow-blow fuse, try increasing the current rating on the fuse. Be conservative; raise it by maybe 25% of the original rating. Don't iterate this process indefinitely, though: it defeats the whole purpose of using a fuse if you have to use a fuse with such a high limit that something else in the circuit blows before the fuse does. If the problem doesn't clear up with a modest increase in the fuse rating, I'd go back and check again for faults, and failing that, I'd consider substituting a different device (a smaller solenoid, for example).Form factor
Fuses come in several physical package types. For pin cabs, I recommend one of the types that plugs into a socket or holder, since this lets you replace a blown fuse by simply pulling the old one out of the socket and plugging in a new one. There are two main options for these: cartridge fuses and blade fuses.
Cartridge
BladeI prefer cartridge fuses. They're the most widely used type in electronics in general, so they have the greatest range of options available.Note that sizes for these fuses vary. There are about ten size classes each for the cartridge fuses and the blade fuses. The fuses linked in this chapter are all cartridge fuses in the 5x15mm (also known as 2AG) and 6.3x32mm (3AG) sizes. I apologize for not sticking to just one size: I was hoping to do that to keep things simpler, but unfortunately I wasn't able to find good matches for everything in one size, so I ended up with a mix.Fuses holders
Cartridge fuses are designed to plug into sockets or holders, so you need the holders to complete your installation. There are several options available; search on Mouser or other electronics sites for "fuse holder". The type I like is a one-piece plastic holder, like these: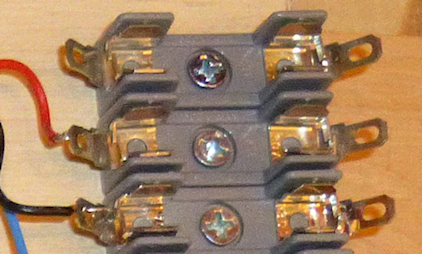 Note that there are several different sizes of cartridge fuses, so you'll need holders that match the size you're using. Here are example holders for the most common sizes (these cover all of the fuses linked in this chapter):These have a screw hole for mounting to just about any surface, so you can mount them directly to your cabinet wall or floor or to a separate piece of plywood that you can later mount in the cabinet. If you're using an output controller, I recommend mounting the controller plus the fuses for all of is outputs on its own plywood carrier. That lets you do all of the initial wiring on your workbench rather than in the confined spaces inside your cab. If you're using an LedWiz or Pinscape board, you'll have a lot of fuses to install, so it makes the work a lot easier.
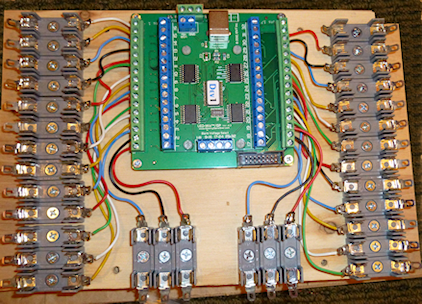 Once it's all set up, you can then mount the whole thing in your cabinet with a couple of screws. This also lets you remove the whole setup later if you ever need to do any repair or upgrade work.
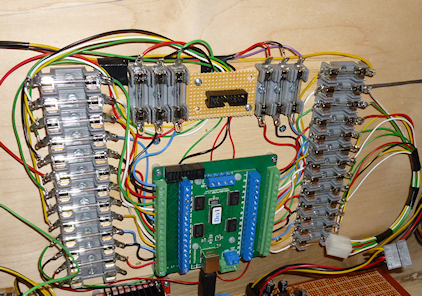 Note that a key element of a modular setup like this is pluggable connectors. You'll want to use some kind of mating plug-and-socket connector to connect all of the wires coming out of the fuses to the devices inside the cabinet. You can see one of the connectors I use in the lower right of the picture above; here's a closeup.
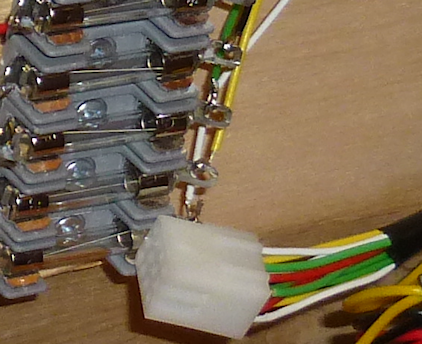 That's a connector from the Molex .062" series, which I found useful for many of the interconnects in my cabinet. There's more information on these and other options in Connectors. The thing I like about pluggable connectors like this is that they help avoid dumb mistakes. You only have to plan out and wire the connectors once, and from then on it's just a matter of plugging the mating connectors back together any time you have to do any work that involves removing something. You don't have to match up the individual wires again, since they're bundled into connectors that only fit one way.
What to protect
If you're not experienced with electronics (and even if you are), it can be tempting to add fuses anywhere and everywhere. But every fuse you add has costs: not just the monetary cost of the fuse, but the space it takes up, the time it takes to wire, and the additional point of failure. It's best to limit yourself to circuits that really benefit from fuse protection.Let's look at the places in a typical pin cab where fuses are most useful.Output controllers
If you're using any sort of output controller to attach feedback devices (such as solenoids, contactors, lights, motors, etc.), it's a good idea to place a fuse in each individual output circuit. This is probably the most important place to use fuses in the whole cab, because it's the place where things are most likely to go wrong.In this case, the point is to protect the controller. We're protecting the controller from two things. First, from simple short circuits. Feedback devices are scattered around the cabinet, so they often have long wire runs, leaving lots of openings for accidental shorts. Second, we want to protect the controller from the attached device. Every output controller has limits on how big a load it can handle, so we want to make sure that the attached device doesn't draw too much power, either routinely or due to a malfunction. A fuse accomplishes that by shutting down the circuit if the power draw goes over the limit.In most cases, we don't need to be concerned with protecting the feedback device itself (the light, motor, etc). That device is usually the threat, not the victim. If anything else in the circuit malfunctions, the worst that usually happens as far as the device is concerned is that it gets turned on at full power. But that's what it's designed for in the first place, so this usually isn't a threat. The exception to this rule is pinball coils, which we'll come to shortly.Since we're protecting the output controller, we need to choose a fuse based on the current limit of the controller:- LedWiz (with no booster board): 500mA (0.5A) per output.
- Pac-Drive (with no booster board): 500mA (0.5A) per output.
- Pinscape power board: 5A per output.
- Pinscape main board flasher & strobe outputs: 1.5A per output.
- Pinscape main board flipper button LED outputs: no fuses are necessary, because these outputs have built-in current limiters.
- Pinscape DIY MOSFET output circuit: the limit depends primarily on MOSFET you choose, but 5A is a safe (conservative) choice for all of the options we recommend in our circuit plans.
- Zeb's booster board for LedWiz: 5A per output. You don't need a separate fuse for the LedWiz in this case, because the booster board isolates the LedWiz.
- PacLed, i-Pac Ultimate I/O: these have built-in current limiters per output, so fuses aren't required.
- Zeb's booster board for PacLed: 5A per output. You don't need a separate fuse for the PacLed.
- USB relay boards (e.g., Sainsmart): Check the specs for your board for the DC current limit for the relay switch. It's usually about 10A.
The wiring for a fuse in an output circuit is the same for all of the controllers, so we'll just show the LedWiz as an example. The basic plan is to interpose the fuse between the output controller port and the device.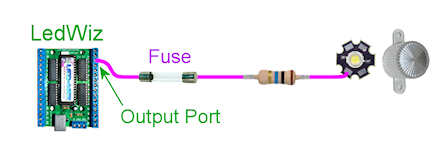 First, connect a wire between the output port on the controller and one end of the fuse. Next, connect a wire from the other end of the fuse to the feedback device (the light, motor, etc). If the device cares about polarity, this is the negative or "ground" terminal on the device.In the diagram above, we used an LED as the example output device, so there's actually an extra step involved, because LEDs usually require resistors (that's a whole separate subject, explained in Feedback Devices Overview). In this case, the resistor goes between the fuse and the LED, so we connect the wire from the fuse to one end of the resistor, and connect a wire from the other end of the resistor to the output device. For anything but an LED, there's no resistor, so the wire from the fuse goes straight to the device.Fuses don't care about polarity, so it doesn't matter which direction it goes. Resistors don't care either.
Pinball coils
Unlike most other feedback devices, real pinball coils can benefit from fuse protection. As we mentioned above, most other feedback devices don't need fuses for their own sake; the fuse is to protect the output controller, not the device itself. But pinball coils are different. They're designed to be activated only in split-second bursts. If you turn one on and leave it on, it'll quickly get so hot that its internal wiring melts, destroying it.To protect against this danger, we can use a special type of fuse called a "slow-blow" fuse. "Slow-blow" means that the fuse takes longer to blow than a regular fuse does. A slow-blow fuse allows a surge of current to flow briefly, but if the current is sustained for too long, the fuse blows. This is exactly what we need to protect pinball coils, which are likewise designed for brief bursts of power, but can't withstand sustained use.Why are we even worried about this? We only use these coils to simulate bumpers and other things that fire momentarily, so why would the software ever leave them on for long periods? Normally, it wouldn't. The danger is that the software doesn't always work perfectly. Sometimes it crashes, and if it crashes at the wrong moment, it can leave an output stuck on. This isn't just a theoretical possibility, either: this has actually happened to other cab builders. It might seem incredibly improbable that the software would crash at such a perfectly wrong moment, but it's actually an especially likely time to crash, because it takes special code to fire a coil in the first place. That code can contain an error that makes the program crash right after the coil turns on, so the code that was supposed to turn the coil back off never gets a chance to run, leaving the coil stuck on.As an alternative to using fuses, or as a second layer or protection, you can use a special time limiter circuit. These circuits contain their own timers that turn the coil off after a couple of seconds, even if the software doesn't. See Coil Timers for details on how to build one of these. If you're using a Pinscape main expansion board for your knocker, it has this type of timer built in to the knocker output. All of the outputs on the Pinscape chime board also have these timers. In my own cab, I use both the timer and the fuse for my knocker coil. I think of the timer as the primary protection, but I still like having a fuse as a last resort in case the timer fails.The types of pinball coils that can benefit from fuses include:- Replay knockers
- Chime units
- Bells
- Bumper assemblies
- Slingshots
Flippers are more complicated; more on them below.How do you choose the right slow-blow fuse to protect a pinball coil? It takes a little research and some guesswork.The first step is to figure the normal operating current for the coil.You need two numbers to figure the current: the voltage you're going to use to operate the coil, and the coil's electrical resistance. The voltage is easy: it's the voltage of the power supply you're going to use with the coil. The resistance is something you can measure with a multimeter: set your meter to the "resistance" or "ohms" setting and measure across the coil's terminals. You should measure the coil while it's not connected to anything else, of course. Here are the specs for some commonly used knocker coils:- AE-26-1200: 10.9 ohms
- AE-23-800: 4.2 ohms
Once you have the voltage and resistance, determine the amperage as Volts/Ohms. For example, if you have a replay knocker with an AE-26-1200 coil that you'll operate at 35V, the current is 35V/10.9Ω = 3.2A.Step two is to decide on a time limit. This is balancing act. We want to pick a time limit that's short enough that the fuse will blow before the coil overheats, but long enough that the fuse won't blow during normal operation. The complication is that slow-blow fuses have inexact timing. They don't give you an exact delay time, just a range of times.Pinball coils on real machines fire for a fraction of a second, anywhere from a few milliseconds to about half a second. We can consider times in this range to be safe for the coil, so we don't want our fuse to blow within the first half-second. But how long is too long? Unfortunately, I don't have any hard data on that. I haven't been willing to sacrifice a bunch of coils to methodically measure burn-out times experimentally, and as far as I know, neither has anyone else. So this is where a bit of guesswork comes in. Anecdotally, I've heard from a few people who've had their coils get stuck on and burn out. From those reports, it appears that coils will pretty reliable overheat after about a minute, maybe two. I've also heard one or two reports of failure after much shorter times, around 10 seconds. Based on these reports, it seems best to choose a fuse that will blow after perhaps 10 to 20 seconds.Step three is to choose a fuse that matches the combination of the current and time we came up with in steps one and two. This is another research step, because slow-blow fuses aren't sold with simple, fixed time limits. Instead, the time limit is a function of the current. The manufacturer presents this function with a chart in the data sheet, like this one, taken from the data sheet for the Bel Fuse 3JS data sheet: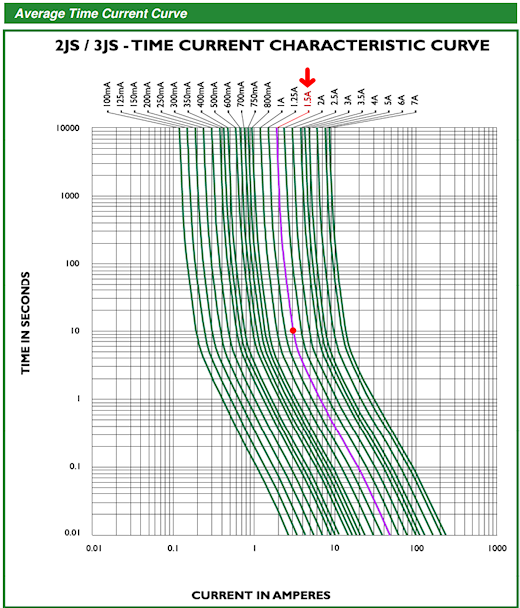 Each green curve represents the current/time relationship for one type of fuse, labeled at the top.Here's the way I use this type of chart to pick a fuse. Let's say we want to pick a fuse for a replay knocker with an AE-26-1200 coil that we're running at 35V. As we calculated above, that gives us 3.2A as the normal operating current for the coil, and as we guesstimated above, we'd like a fuse that blows in perhaps 10-20 seconds. So let's go to the chart, and find the intersection of 10 seconds and 3.2A. I marked that spot with a red dot. That happens to fall right on one of the green lines - if it didn't, it would be between two lines, so we could pick the closest. I highlighted the line we're on to make it easier to follow. Now trace the line to the top of the chart to see which fuse it's for: it's the 1-1/2A (1.5A) fuse.It seems a little strange that we're going to use a 1.5A fuse for a 3A coil, but the amp rating on the fuse is only nominal. The timing chart tells the full story, and in this case the timing chart says that the nominally 1.5A fuse will let our 3 Amps flow for up to about 10 seconds. In case you're still not convinced, I've been running with this fuse protecting my own AE-26-1200 replay coil, and it hasn't ever blown on a false alarm.Since this is such a common coil in virtual pinball machines, I'll save you the trouble of finding the 1.5A version of this family. Here's the part number and a Mouser link: Bel Fuse 3JS 1.5-R TR.Wiring the fuse for a knocker is just like wiring a fuse for any other output device. The fuse goes between the output port on the controller board and the knocker coil. Here's a diagram; we use an LedWiz with booster board as an example, but it's the same for any other type of output controller.
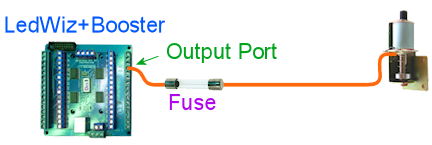 First, run a wire from the output port on the controller board to one end of the fuse. Next, run a wire from the other end of the fuse to the knocker. This connects to the negative side of the knocker coil, usually signified by a black wire. (The coil itself doesn't care about polarity, but it should have a diode attached, and the diode does care.) Fuses have no polarity, so the direction you connect the fuse doesn't matter.
Flipper coils
Flipper coils are more complicated than most other types of pinball coils, but in a way that actually simplifies things for our purposes here. In most cases, you won't need a fuse for a real flipper coil. The reason is that flipper coils for real machines are built to tolerate being activated for long periods. They have to be, because players routinely hold a flipper up to trap a ball. So unlike other pinball coils, these coils are designed to withstand continuous power, and thus don't need to be protected from getting stuck on.How do they accomplish this, when other coils can't? Their trick is a clever two-coil design. Flipper coils are really two coils in one: two separate coils of wire wrapped around the same core. One coil is the high-power "lift" coil, which generates the strong initial force that lifts the flipper from the rest position and propels it (and the ball) through the flipper's arc. The other coil is the low-power "hold" coil, which only kicks in when the flipper reaches the top of its arc. The hold coil only has to exert enough force to hold the flipper in place; it doesn't have to propel the flipper or the ball. This allows the hold coil to operate at much lower power - low enough that it can be left on indefinitely without overheating. The flipper assembly toggles power between the two coils by way of an end-of-stroke switch, which the flipper trips mechanically when it reaches the top of its arc.If you're planning to use a real flipper coil in your virtual cab, you should make sure that it's part of a full flipper assembly that has the end-of-stroke switch in place and properly adjusted. The end-of-stroke switch is critical because it's what prevents the lift coil from getting stuck on. If the lift coil gets stuck on, it'll overheat like any other pinball coil.The dual-coil design isn't universal. Newer Stern machines (2000s onward) dispense with this somewhat complex electro-mechanical design and use a somewhat complex software system instead. On these machines, the flipper coil is just an ordinary coil with a single winding. The flipper button is connected to the CPU, not directly to the flipper. When you press the button, the CPU turns the coil on at full strength. But this lasts only for a split second, long enough for the lift stroke. Once that initial time period has passed, the software reduces power to the coil using PWM, or pulse-width modulation. PWM is a method for controlling power by switching the voltage on and off rapidly (hundreds of times a second).The single-coil Stern design isn't suitable for virtual cabs, because it requires the specialized software system to manage the power. None of the current software or hardware in the pin cab environment can do this. So if you want to use a real flipper assembly, you should use the traditional dual-coil type, not the newer Stern single-coil type.Other solenoids
Solenoids might or might need the same protection as pinball coils (see above) against being left on for long periods.To find out whether you need a fuse for your particular solenoid, start with the data sheet, if one is available. Look for information on maximum continuous "on" time.If you can't find a data sheet, or it has nothing to say on the subject, you can do some testing of your own. Apply power to the solenoid for a couple of seconds, then cut power. Check to see if the solenoid feels hot. If not, try again, leaving it on a little longer. Repeat, extending the time on each trial, until the solenoid starts feeling hot to the touch. If you can leave it energized continuously for several minutes without it getting too hot, you probably don't have to worry about a special fuse for it. If it does start getting hot within a couple of minutes, though, you should add a slow-blow fuse using the same procedure explained above for pinball coils.If you're using a solenoid to simulate any sort of rapid-fire device, like a bumper, slingshot, replay knocker, chime, bell, etc., the same rule of thumb for timing that we used for pinball coils should work well here. However, you might want to extend the maximum time a bit, like taking it up to 30 to 60 seconds, assuming your solenoid didn't overheat that quickly in the tests above. The reason is that bumpers and the like get a lot of use in some games - they fire briefly, but many times in a row. Many short bursts in a short time add up, since this is all about heat dissipation. So choosing a fuse with too short a time limit might result in the fuse blowing unnecessary during bursts of activity during normal play.Wire the fuse for a solenoid the same way you would for a pinball coil.PC/ATX power supplies
Good news! You probably don't need any fuses for PC ATX power supplies. These almost always have built-in thermal overload protection that temporarily shuts them down if they overheat. That's the same function a fuse performs, so there's no need for a separate fuse; the built-in protection is all you need. The thermal protection circuit in an ATX power supply should automatically reset itself when the temperature returns to normal, so you won't have to open it up to replace a fuse, or even push a reset button, if you ever trigger an overload. Just unplug everything for fifteen minutes or so to let the power supply cool down. (And while you're waiting, you might also want to fix whatever caused the short circuit or overload in the first place!)OEM power supplies
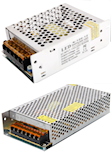 Pin cab builders
often use a mix of power supplies that includes one or more generic,
no-name power supplies from eBay that look similar to the ones shown
at right. These are often sold on eBay as LED strip PSUs or OEM PSUs,
since they're primarily designed for sale to other manufacturers
to embed in consumer devices.
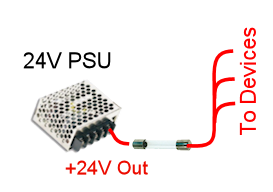
These power supplies might or might not have built-in overload protection. Check the site where you bought your to find out if they say anything about it. Also check to see if it has its own replaceable fuse accessible from the exterior of the case (this is rare).If there's no built-in overload protection, you might want to protect the power supply with a fuse.Choose a fuse that matches the rated maximum output amperage for the unit. If the unit's output limit is only stated in Watts, you can determine the maximum amperage by dividing Watts by Volts, using the voltage on the output side. For example, if your power supply has 12V output and a maximum power output of 48W, the maximum amperage output is 48W/12V = 4A. So you'd choose a 4A fuse.(Earlier, we talked about a 75% rule of thumb, where we use a fuse rated for 75% of the maximum for what we're protecting. That applies when we're protecting a transistor or IC chip. Power supplies shouldn't need this adjustment, since the components they use aren't as vulnerable to brief current surges.)Connect a power supply fuse as shown in the diagram below. (We show a 24V supply as an example, but the principle is the same for any voltage.) Run a wire from the power supply's positive (+) output to one end of the fuse. Connect the other end of the fuse to whatever devices the power supply will be powering.
Step-up and step-down voltage converters
Pin cab builders sometimes use step-up and step-down voltage converters to get special voltage levels that you can't easily get from a PC power supply or eBay/OEM unit. For the purposes of fuses, you can treat these converters the same as power supplies.Look at the instructions or spec sheet for the converter to determine its maximum output current. Select a fuse that matches the maximum current.Note: If you're only using a converter to power a single device (e.g., a knocker coil or a shaker motor), and you already have a fuse in the circuit, you don't need a separate fuse for the converter. The first fuse will protect the whole circuit. Just make sure that its amperage limit is below the converter's maximum output amperage rating.Wire the fuse for a converter the same way as with a power supply. Connect a wire from the converter's positive (+) voltage output to one end of the fuse. Connect the other end of the fuse to each device that the converter will be powering.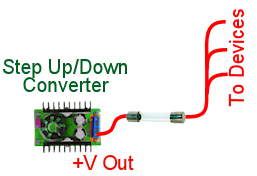
Fuses vs resettable devices
Fuses have the downside of being expendable: when a fuse blows, you have to throw it away and replace it.It's possible to find resettable (non-expendable) circuit protection devices in the range of currents we use in a pin cab. I don't have experience with any of these devices myself, and I haven't found any options that look ideal for our purposes. But I wanted to mention them in case you don't like the idea of expendable fuses and wanted to look into reusable alternatives.One thing you could look at is mechanical circuit breakers. These are similar to the ones you might find in the electrical panel in your house. There are options for these with suitable specs for a pin cab. The cheapest are a few times the price of an equivalent fuses, so they're more expensive if you never blow a fuse, but could end up being cheaper if the same circuit overloads several times.Another possibility is PPTC (polymer positive temperature coefficient) devices. These are essentially temperature-dependent resistors that develop very high resistance when they got hot. High current levels heat them, triggering the rise in resistance, effectively cutting off current (or at least greatly reducing it). These devices have the advantages of being very compact, and being passive: you don't have to reset them after a fault (the way you do with a mechanical circuit breaker), since they return to normal resistance when they cool. PPTCs are widely used in PC equipment, including ATX power supplies.The big problem I see with circuit breakers and PPTCs is that they're slow. They tend to have timing curves similar to slow-blow fuses. That makes them good for fire prevention, but bad for protecting semiconductors - which is the primary function we need fuses for. For circuits where we need to protect transistors and ICs from short circuits and overloads, we need something that interrupts the current flow almost instantly on overload. The only thing I've found that does this is traditional, expendable fuses.