60. Replay Knockers
The replay knocker is the device in a real machine that makes the loud
knock noise when you win a free game, exceed the replay score, etc.
This is implemented in the real machines with a solenoid coil
positioned in the backbox so that its plunger strikes a metal plate
when fired.
The knocker isn't used all that often, and all it does is make a
noise, but I still consider this a must-have toy. When the knocker
does fire, it's always at particular dramatic points during play, so
it really demands the same dramatic sensory effect as the real thing.
Recorded audio played back through speakers is a pale imitation.
Parts
Knockers are pretty simple mechanisms, so it wouldn't be hard to
improvise a DIY version using a push-type solenoid. But there's not
much point to that, since you can just buy a real one for about the
same money it would cost to build a DIY version. And the real ones
comes as full assemblies, so they're easy to buy and install.
There are two parts to buy, both available from pinball parts vendors
like Pinball Life and Marco Specialities:
- The knocker assembly itself. Look for Williams/Bally reference B-10686-1. You might be offered a choice of coils. Any of the options available from your vendor should work, but the recommended one is AE-26-1200. These sell for about $25.
- A knocker strike plate. This is a small steel plate that the knocker plunger hits, to enhance the sound effect (and protect the backbox area where the plunger hits). You can substitute a similar metal plate from Home Depot, such as a steel backing plate or tie plate, but the pinball part is cheap (about $3), so you might as well add one to your cart as long as you're ordering the knocker assembly.
Installation
Modern replay knockers are designed to be mounted vertically in the
backbox, on the back wall near the top, so that the plunger strikes
the ceiling of the backbox. They have to be installed vertically
because the assemblies don't have springs; they depend on gravity to
pull the plunger back to the rest position after firing.
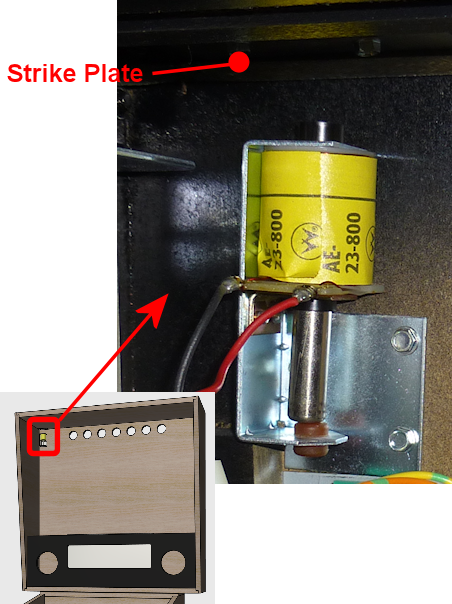
Install the knocker as shown above, so that the top of the knocker
assembly is about 1" below the ceiling of the backbox. Mount the
strike plate on the ceiling just above the knocker assembly.
The knocker assembly should come with the plunger already inserted
through the coil, but it can fall out. If it has fallen out, insert
it so that the white plastic tip is facing up. The white
plastic tip is the part that hits the strike plate. Many people find
this surprising - it seems like the metal end should be the hammer
end. That's understandable but wrong. The metal end is actually the
magnetic element that gets pulled into the coil, so it should be
facing down.
Power supply
Modern replay knockers are designed to run on 50V DC power. They'll
run on lower voltages, down to about 24V, but the power of the effect
will be correspondingly reduced.
50V supplies are expensive difficult to find, but you can find
relatively inexpensive 48V supplies on eBay. If your budget can
tolerate it, I'd buy a dedicated 48V, 5A supply, which are available
for about $20. If you're using any other real pinball assemblies,
such as flippers, slingshots, or bumpers, you'll need a 48V supply for
those anyway, so you can just attach the knocker through that.
If your budget is tight, you can use an existing 24V supply, but the
effect will be a bit weak. You might consider buying a "DC to DC
step-up converter" on eBay to boost the power as high as possible;
converters that will take the power to about 40V are available in the
$10 range. But given that a dedicated 48V supply is only a little
more expensive, I think that's a better option.
Caution: 48V is a hazardous high voltage. Be careful to turn off
power when working inside the cabinet once you have a 48V supply
installed. Note that there will be a live +48V voltage to the
knocker's red wire any time the power supply is connected, even
when the knocker isn't firing, since the knocker is controlled
through the black wire.
Wiring
A new knocker assembly usually comes with a diode already installed,
and two wires, one red and one black. Connect the red wire directly
to the positive (+) power supply voltage. Connect the black wire
to an available output port on your output controller.
If your coil doesn't come with a diode already installed, you
must add your own, to protect your output controller and other
electronics from interference from the magnetic field from the coil.
See Coil Diodes.
The Williams/Bally knocker assemblies come with a Molex 3-pin .093"
cable connector. You can cut this off and solder your own wires if
you like, or you can buy a matching connector. The matching connector
is available from pinball vendors and from electronics companies
like Mouser:
If you're using the Pinscape expansion boards, connect this to the
"Knocker" pin on the JP9 pin header. This is a "timer protected"
output, to prevent the knocker coil from getting stuck on. That
protects the coil from overheating in case of software failure.
See Coil Timers.
If you're using an LedWiz, you'll have to use a booster circuit of
some kind. The replay knocker will draw 3-4A when activated, which
exceeds the 500mA (0.5A) maximum for an LedWiz port. You can connect
the knocker directly to the Pinscape expansion board's dedicated
"Knocker" output, or directly to any Power Board or Chime Board output
port.
DOF Setup
In the DOF Config Tool, go to the Port
Assignments page. Find the port number where you wired the replay
knocker coil. Assign this to "Knocker".
