37. Plunger
Plunger or Launch button?
- Plunger and launch button. The most popular option among pin cab builders. Lets you choose the best type of control for each game.
- Launch button only. Simpler and cheaper, but sacrifices the control of a real plunger for skill shots.
- Plunger only. This is an option if you're using Pinscape or a Zeb's Boards plunger, because these devices can do double duty as virtual Launch buttons when needed.
Option 1: Plunger and Launch button
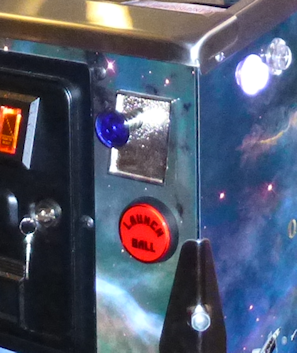 I haven't done a scientific survey of cab builders, but I think the
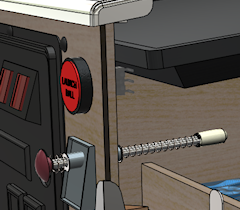
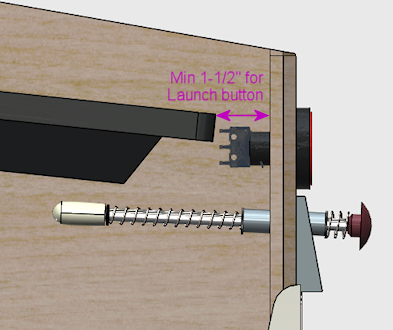
most common answer to "plunger or launch button?" is "both". With
the plunger in the standard position, there's room directly below
it for a Launch button, at least in a full-sized cab.
Option 2: Launch button only
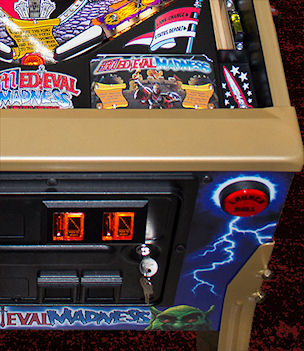 Some pin cab
builders choose to forego a plunger entirely and just use a Launch
Ball button. This is a perfectly viable option functionally, because
all of the PC pinball programs let you operate the on-screen plunger
via the keyboard. And it doesn't make your machine look unrealistic,
since a number of popular real arcade pinball machines also used
button launchers.
Option 3: Plunger only
Which option is best for you?
| Plunger | Launch Button |
|---|---|
| Realistic | Simple |
| Skill shots | Cheap |
| Classic look | Modern look |
Choosing a plunger device
| Device | Type | Price (est.) | Degree of difficulty | Accuracy | Features |
|---|---|---|---|---|---|
| VirtuaPin plunger kit | Commercial | $160 | Easiest | Not tested | 15 buttons, accelerometer |
| Zeb's Boards plunger kit | Commercial | $150 | Easiest | Not tested, est. Very Good (<1mm) | 19 buttons, accelerometer |
| Pinscape potentiometer | Open source | $20 | Medium Low | Very Good (<1mm) | All Pinscape features |
| Pinscape with Oak Micros potentiometer | Open source | $25 | Low | Very Good (<1mm) | All Pinscape features |
| Pinscape TCD1103 | Open source | $50 | High | Excellent (0.1mm) | All Pinscape features |
| Pinscape AEDR-8300 | Open source | $30 | High | Excellent (0.1mm) | All Pinscape features |
| Pinscape VCNL4010 | Open source | $10 | Low | Good (1mm) | All Pinscape features |
| Pinscape VL6180X | Open source | $20 | Medium | Low (1cm) | All Pinscape features |
| Pinscape TSL1410R | Open source | N/A | Medium High | Very good (0.25mm) | All Pinscape features |
- If you want it super easy: the Zeb's Boards kit
- If you want it super cheap: Pinscape with potentiometer or VCNL4010
- If you want the Pinscape features, with fairly easy setup: Pinscape potentiometer, VCNL4010
- If you want the best performance, and you're up for a more challenging build: Pinscape AEDR-8300 or TCD1103
- VirtuaPin's product uses an IR proximity sensor to detect the plunger position. That's a nice design in principle because it's physically simple and reliable, but when I tested their version 2 product years ago, I found that it was too low-res for my needs. Their version 3 product (current as of 2021) uses a different sensor that has better native performance, but I haven't tested their implementation. The v2 sensor resolution was the only problem I had with this product, though; otherwise it's a solid offering, well packaged and easy to set up. It includes a button encoder that lets you connect about 15 cabinet buttons, and an accelerometer for analog nudge input. It's not expandable, though, and 15 buttons is a bit limiting for a decked-out pin cab.
- The Zeb's Boards plungers use slide potentiometers as sensors. I haven't tested any of Zeb's plunger products myself, but I consider the basic physical sensor type sound because the same sensor type works well with the Pinscape software. The Zeb's Boards products include button input connections and accelerometer nudging features similar to the VirtuaPin product. Zeb's has an excellent reputation for technical support.
- Potentiometer: A potentiometer is a variable resistor, in this case
one with a sliding lever that smoothly varies the electrical
resistance level as you move it from one end to the other. They make
these primarily for audio mixing panels and similar control panels,
but they also work well for plunger position sensing, since the
plunger slides back and forth in a straight line. The plunger travel
range is about 80mm long, so we need a sliding potentiometer with a
slightly longer travel than this. Suitable pots around 100mm long
are easy to find.
The performance of these sensors is pretty good. In my testing, you get accuracy of about 1mm, which is good enough for smooth on-screen animation and tracking. The only negative is that the analog nature of the device means that there can be some random noise in the signal, which shows up on-screen as "jitter". It's pretty minor, and the Pinscape software has a filtering option to reduce it, with some trade-off in accuracy.
Pots are the least expensive type of plunger sensor, since the only required part (other than KL25Z) is the potentiometer, which runs about $6 at Mouser. If you want to keep it really cheap, you can improvise your own mounting apparatus out of plywood and generic fasteners (L-brackets or that sort of thing). If you want to make it a little tidier (at slightly higher cost), the plans in this guide include a 3D-printable mounting bracket that you can fabricate.
- Oak Micros's potentiometer (no longer available): This works the same as the DIY potentiometer above, but it comes with an easy-to-install mounting bracket and saves you the work of sourcing the parts and assembling and wiring everything. I don't think this is available any longer, because Oak Micros announced in June 2021 that they're no longer shipping any of their products. You can check the original announcement on vpforums to see if there are any updates:
- VCNL4010: An IR proximity sensor that can measure the distance to a nearby object, such as the end of the plunger. For a Pinscape setup, you mount the sensor near the end of the plunger, so that it can measure the distance between itself and the plunger; that serves as a measurement of the plunger's current position. This sensor is cheap (about $7.50) and easy to set up (maybe even easier than the potentiometer), and it's completely non-contact (no wear and tear from moving parts). Its performance isn't quite as good as some of the other options (the potentiometer, AEDR-8300, and TCD1103 are all more precise), but it's still pretty good. Given its low price and easy installation, it's worth considering.
- TCD1103: This is an optical imaging sensor that detects the plunger
position by rapidly taking pictures of the plunger. The TCD1103 chip
is a high-resolution CCD (a type of camera sensor) that produces great
quality images, which makes for excellent performance in the position
sensing. It's capable of reading the plunger position to better than
1/300", with great stability, which makes for a very smooth on-screen
response. The downsides of this sensor are that it's complex
to build, and fairly expensive. It requires some additional electronics to interface to the
KL25Z, as well as a small lens to focus the plunger image onto the
sensor. I've designed a printed circuit board and 3D-printable
mounting bracket (both open-source, of course) to bring it all
together, so it's fairly straightforward to assemble one of these
systems using my plans. However, there are enough parts involved that
it does take a little online shopping work to source everything -
plus, the printed circuit board uses SMD (surface-mount) components,
which can make the soldering job intimidating if you haven't worked
with these before. But I really like this sensor for its excellent
performance and the fact that it has no mechanical contact with the
plunger (so there are no moving parts to wear out). See
Plunger Setup (TCD1103).
This is a fairly expensive option. The sensor chip all by itself costs about $15 at Mouser, and you'll also need a lens (around $8), lens holder (about $1), circuit board ($6-$15), a 3D-printable mounting bracket (around $10 if you have to order it from a commercial 3D print service), and a few other electronic parts ($5), for a total around $50.
- AEDR-8300: This is a specialized IC chip known as
a "quadrature encoder", which uses optics to detect motion across a
pattern of uniformly spaced, alternating black and white bars. The sensor tracks
motion by counting the bars it passes. The bars are closely
spaced, 75 line pairs per inch, and the sensor can determine its
position to half the width of a bar, so the position reading is accurate to 1/300".
This is an excellent sensor in terms of accuracy and
stability; when set up properly, it really does achieve that 1/300"
accuracy, which makes for silky smooth animation and tracking in the
on-screen plunger. The big downside is that it's rather complex to
set up, both because it requires a bunch of specialized (but easily
fabricated) parts, and because the AEDR-8300 chip itself is a tiny
SMD (surface-mount) chip that can be intimidating to work with
if you haven't done SMD soldering work before.
See Plunger Setup (AEDR-8300 Encoder).
This option requires a custom circuit board ($5), the electronics for it ($10), a laser-cut acrylic piece (about $1, although it's only practical to order in quantities of about a dozen), and a 3D-printable bracket ($15), which adds up to about $30 in parts.
- VL6180X: This is a "time-of-flight" IR distance sensor, which means
that it measures the distance between the sensor and a nearby object
by measuring the amount of time it takes for a pulse of light to
reflect off of the object and return to the detector. For use with a
plunger, you position the sensor at the end of a tube that you place
around the plunger, with the sensor pointing at the plunger tip to
measure the distance to the tip. The software works out the plunger
position using the distance reading, knowing that the sensor is always
at the same fixed position. These are relatively cheap and very easy
to set up, since you can buy pre-built boards featuring these sensors
from several hobby-electronics companies. Unfortunately, I don't
consider these accurate enough to be usable - close, but not close
enough. They nominally take distance readings in 1mm increments, but
they're really only accurate to about 1cm. That makes the on-screen
plunger animation very "chunky" when you connect them to a pinball
program. They need about 10x better accuracy to be really workable;
maybe the next generation in a few years will achieve that. I don't
recommend these, but given how easy they are to set up, some people
might find them "good enough." See Plunger Setup (VL6180X Distance Sensor) if you want
to read more about these.
You can buy pre-built boards with this sensor for about $15 from Sparkfun, Adafruit, and some other hobby robotics companies. You'll also need to improvise some kind of mounting bracket, which might add a little cost if you come up with something requiring 3D printing.
- TSL1410R/1412S: This is the late, great, original Pinscape sensor, but sadly, the manufacturer stopped making it and the supply dried up a long time ago. This sensor was a linear photosensor array, consisting of a single row of 1280 pixels (1410R) or 1536 pixels (1412S). The row of pixels was by a magical coincidence roughly the same length as the overall plunger travel distance of about 80mm, so the idea was that you placed the sensor near and parallel to the plunger rod, and placed a light source on the other side; the software read the position by taking a snapshot of the pixels and scanning the image for the shadow cast by the plunger. This worked pretty darn well and was only middlingly difficult to set up, although the sensors themselves were fairly pricey (about $40). But alas, it's more or less impossible to build this design now since it's more or less impossible to find the sensors. But for the sake of historical reference, you can still read about it here: Plunger Setup (TSL1410R Optical Sensor).
- Use a computer mouse that's either attached to the plunger rod, or positioned so that it can scan something attached to the plunger rod. See "My Mouse Plunger Setup (aka... Cheap :)": www.vpforums.org/index.php?showtopic=38064.
- Some early pin cab builders created a sort of hybrid of the plunger and launch button by using a microswitch at the end of the plunger travel as the sensor. The switch was connected to a button encoder as the Enter key, so that pulling back the plunger by any amount acted like pressing Enter, and releasing it would hit the switch again and release the Enter key. You launched the ball using the desktop convention of a timed plunger pull based on how long you held down the Enter key. This isn't a position sensor by any means, but it's simple and at least creates the appearance of a plunger.
- One person on the forums several years ago used an LVDT (liner variable differential transformer), a type of position sensor that uses inductive coils to sense the position of a metal rod. Sounds perfect for a plunger sensor, doesn't it? The snag is LVDTs are super expensive (hundreds or even thousands of dollars) and hard to come by. LVDTs were apparently popular in industrial applications ten or twenty years ago, but they seem to have been largely replaced by optical and magnetic quadrature sensors in more recent times. The ones still on the market are ridiculously expensive specialty products that are way out of range for a pin cab project. It also looks like the electronics to interface one to a microcontroller are pretty complex.
Positioning the plunger
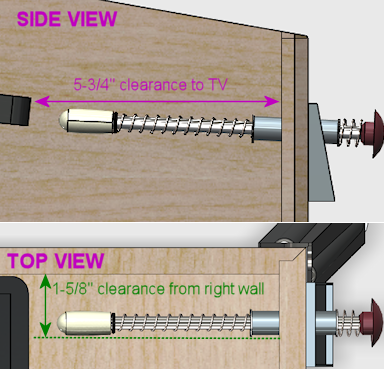
- The TV. On a real pinball machine, the plunger is in roughly the
same plane vertically as the playfield. They make this fit on a real
machine by cutting a plunger-sized notch out of the playfield at that
corner. That's not helpful for virtual cabs because you can't cut a
notch out of the TV. If you're positioning the TV in the same plane
as the plunger, you'll have to leave a gap between the front of the
cabinet and the front of the TV to make room for the plunger. If you
don't want to leave a gap, you'll have to move the plunger down
far enough to get it out of the way of the TV.
See also "The dreaded plunger space conflict" in Playfield TV Mounting.
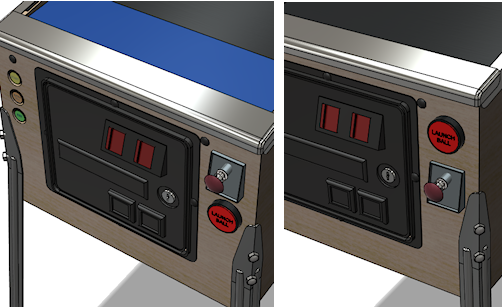
- The right wall of the cabinet. This constrains how far to the right the plunger can go. The standard plunger position, shown in the drilling template below, is positioned about as far to the right as it can possibly go, due to the bolts on the housing. Don't try to move it further right.
- The flipper buttons. The plunger is usually in the same plane as the flipper buttons. If you're using standard leaf switches like on a real machine, there should automatically be enough room , since the "right wall" constraint above leaves enough room (just barely) for the buttons and switches on a real machine.
- The coin door. This limits how far left you can move the plunger. On a standard-width cabinet, there's about 1" of clearance between the plunger housing and the coin door. (You'll have more clearance if you're building a widebody cabinet or a custom size that's wider than standard.) This isn't usually a significant constraint since you usually want the plunger positioned as far right as it can go.
- The right front leg. If you're using real pinball parts for the legs, this constrains how far down you can move the plunger from the standard position. You can move down by at most about 3" from the standard position.
Drilling the holes
Standard ball shooter hardware
- Shooter rod: 20-9253
- Shooter housing: 21-6645-1
- Shooter housing sleeve: 03-7357
- Barrel spring (¾" long x ⅝" diam): 10-149
- Inner spring (5½" long x ½" diam): 10-148-1
- E-clip (⅜" shaft, 5/16" groove): 20-8712-37
- Washers (25/64" x ⅝", 16 gauage, qty 2): 4700-00051-00
- Rubber Tip: 545-5276-00
- Ball shooter mounting plate: Williams/Bally 01-3535
- #10-32 x ⅝" machine screws (quantity 3; ¾" length will also work)
How to assemble a standard plunger
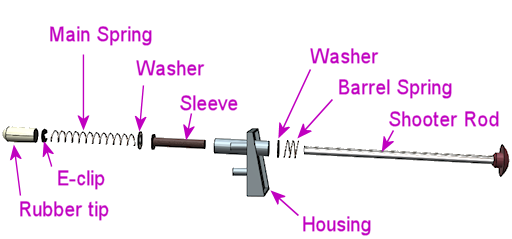
- Slip the barrel spring over the shooter rod and push to the knob end
- Slip the washer over the shooter rod and push down to the barrel spring
- Insert the nylon sleeve into the shooter rod opening in the housing (from the inside of the housing)
- Insert the shooter rod into the opening the housing (from the outside of the housing)
- Slip the other washer onto the shooter rod
- Slip the main spring onto the shooter rod
- Attach the E-clip to the rod. You'll have to hold the spring back while you do this, since the spring will be compressed in its normal position. The E-clip fits into the groove near the end of the rod. Use needle-nosed pliers to snap it into position.
- Fit the rubber tip over the end of the rod. (This is optional in a virtual cab; you probably don't need the tip unless you're using some kind of optical sensor that requires it. Leaving it out will save a little space if you have tight clearance to the TV.)