108. Pinscape Config Tool Plunger Setup
The first step in setting up a plunger is to configure the proper
sensor type and hardware connections.
- Launch the Pinscape Config Tool
- Go to the Settings page for your device
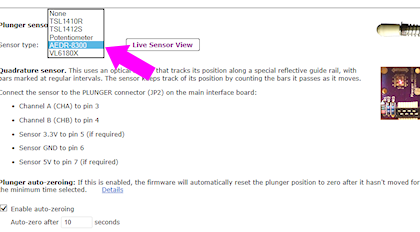
- Scroll down to the Plunger Sensor Setup section
- Select your sensor type from the drop list
If you're using the expansion boards, the pin connections to the
KL25Z should be set automatically. If you're using a standalone
KL25Z, you have to set the GPIO pins to match the physical pins
where you connected the sensor.
The wiring details are different for each sensor type, and the
individual sensor-specific chapters cover that in detail, so refer to
the appropriate chapter for the type of sensor you're using for
wiring instructions.
Initial testing
After you've configured the plunger sensor type and pin connections,
you're ready to test and calibrate the plunger. Return to the main
screen, and click the plunger icon for your device:
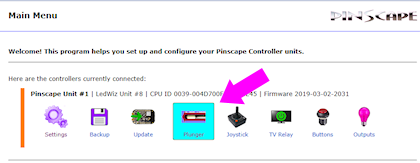
This will bring up the plunger sensor viewer.
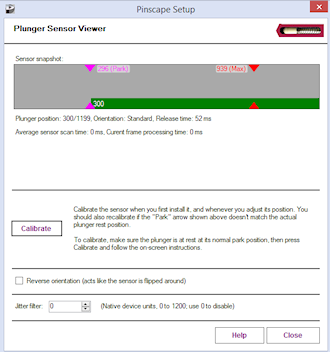
The green bar in the "sensor snapshot" area shows the plunger position
that Pinscape software detects. The first thing to check is to make
sure that this tracks the plunger when you move it. When you pull
back the plunger, the green bar should move towards the right,
and should track the physical plunger motion linearly. The "plunger
position" number printed just below should increase as you pull
the plunger back.
If the bar moves backwards (it moves to the left as you pull back the
physical plunger, and the plunger position number decreases), the sensor
is installed backwards from the expected orientation. But that's okay!
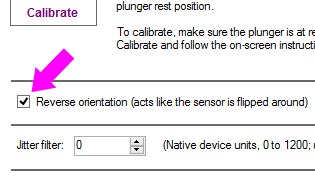
The software can compensate. All you have to do is checkmark the
box "Reverse orientation" towards the bottom of the window.
If the bar doesn't move at all, there's something wrong with the
sensor or the wiring to the KL25Z. First, go back to the settings
page, and double-check that the sensor type and GPIO pin assignments
are correct. If that all looks good, it must be a problem with the
physical wiring. Check all of the connections: make sure everything
is plugged in where it's supposed to be plugged in, and carefully
inspect all of the solder joints and crimp pin connections.
Calibrating with the Config Tool
Before you can use the plunger in games, you have to calibrate it, to
align the software's numeric readings with the physical range of the
sensor. Calibration is done from the sensor viewer window we used
above to view and test the sensor operation.
To calibrate:
- Launch the Pinscape config Tool
- Click the Plunger icon for the device to bring up the plunger sensor viewer
- Click the Calibrate button
- Follow the on-screen instructions
The calibration process runs for about 15 seconds, during which you
should move the plunger over its range per the on-screen instructions.
The process stops automatically after the software has collected the
sensor range data. The calibration information is saved in the
KL25Z's non-volatile memory, so the device remembers it across
reboots and power cycles.
The calibration procedure is basically a one-time operation - you only
have to do it when you first install the sensor. There's no need to
repeat it routinely (for example, you don't have to recalibrate
every time you reboot Windows or power up the machine). You only need
to run through the calibration again if you uninstall and reinstall
the sensor. Recalibration is necessary at that point because you'll
probably have changed the sensor's physical alignment, at least
slightly, so you'll want to recalibrate to get the software back in
sync with the new physical setup. You can also recalibrate any time
the sensor seems to be off (e.g., the on-screen plunger isn't coming
to rest at the normal park position).
Calibrating with the calibration button
If you installed a dedicated calibration button, you can also
calibrate using the button instead of going through the Config Tool
UI. There's no good reason to do that, as the Config Tool has a
friendlier UI that shows more information about what's going on, but
the button will work, too, if you prefer to use that for some reason.
The procedure is described in Pinscape Plunger Calibration Button.
Windows calibration = bad!
Windows has its own joystick device calibration procedure, which you
get to via the Windows control panel called "Set up USB game
controllers". Don't use it!
Everyone always wants to run this. They see the calibration option in
Windows and think it must be there to help. It is there to
help, but only for real joystick devices. It's a disaster to
use with nudge/plunger devices, because they're not anything like real
joysticks. Nudge/plunger devices only pretend to be joysticks
so that they don't need separate device drivers.
If you accidentally ran the Windows calibration before you read this
warning (everyone does!), you'll need to delete the Windows calibration.
The Windows calibration will screw up the Pinscape readings and make
your nudge and plunger inputs act erratically. Fortunately, they
made it pretty easy to reset the unwanted calibration data:
- Open the "Set up USB game controllers" control panel (press Windows+R, type joy.cpl, press Enter)
- Select the Pinscape device
- Go to the Settings tab
- Click Reset to Defaults
Jitter filter
Near the bottom of the Plunger Sensor Viewer window, there's a setting
called "Jitter filter":
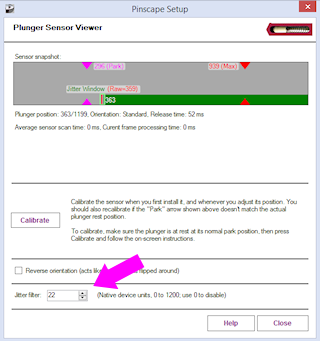
This sets the size of the "jitter window." When you set this to a
non-zero value, the window will be shown visually in the sensor
snapshot area, as a little box around the end of the plunger position
bar.
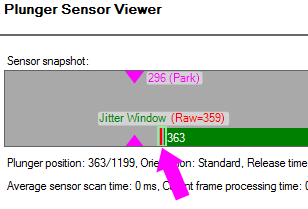
When the jitter window is set to a non-zero value, raw sensor readings
that vary within the window will be ignored. Any time the raw sensor
reading goes outside the current window, the window will move far
enough to contain the new reading.
The point of the jitter filter is to make the on-screen plunger stand
still when the real plunger is standing still. That might seem
something that should happen anyway, without any filtering, and you're
right - it should happen anyway! But remember that we're
dealing with an electronic measuring device, and all measuring devices
have some inherent imprecision. Suppose you're asked to measure the
length of a line with a ruler, to the nearest 1/32 of an inch, but the
ruler only has markings in 1/8 inches. You plop down the ruler and
squint at where the end of the line falls between the nearest 1/8"
marks, and you come up with the nearest estimate. Now you hand it
over to a friend and ask what they think. Chances are that their
reading will be just a little different from yours, since you both had
to interpolate between the 1/8" marks. And if you go back and take
another reading yourself, you'll probably get a third value. Plunger
sensor readings are like that: the sensor takes samples hundreds of
times a second, and each sample has a little of that inherent
measuring error, so each successive sample is likely to be slightly
different from the last one even when the true position isn't
changing. That shows up in the on-screen plunger as jitter. You see
those slightly variations from one sample to the next as little
motions of a pixel or two on-screen.
If the sensor is accurate enough that those little measurement errors
are too small to see in the on-screen plunger, the jitter filter can
be set to zero. The AEDR-8300 sensor is that accurate. The "analog"
sensors - the potentiometer and the IR distance sensors - tend to have
higher inherent measurement errors that make jitter filtering helpful.
To tune the jitter filter, start by setting it to zero. Observe the
green plunger position bar. If it's simply standing still, you're
set; you don't need a jitter filter at all. That should be the case
with the AEDR-8300 sensor. If it's jittering at all, gradually
increase the jitter window size. Observe the light green box around
the end of the plunger bar. When the jitter window box is standing
still (even though the raw reading, shown by the dark green bar, might
still be jittering around within the box), the window is big enough.
You can try reducing the window size to see if the green box stays
steady with a smaller value.
Smaller is better with the jitter window because a bigger window means
less precision when you do actually move the plunger. Filtering like
this always trades precision for stability. You want to apply just
enough filtering to get rid of the noise (or reduce it to a tolerable
level) without filtering out too much of the true information you're
trying to measure.
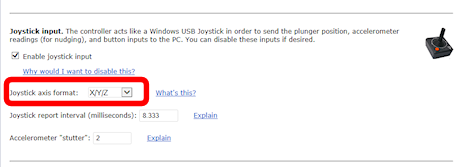
Axis selection
The Pinscape software normally sends plunger readings to the PC using the
"Z" axis, since that's the convention that almost all pinball
player software uses. I recommend sticking with that default,
since it's the most widely compatible option.
However, for special situations, the Config Tool gives you the option
to use a different set of axes, known as the "R" axes. This change
can be made in the Config Tool's Settings page, under the Joystick
section:
For more on the "R" axis settings, see "Axis settings" in
Accelerometer (Nudge) Setup.
Auto-zeroing (quadrature sensors only)
If you're using the AEDR-8300 sensor, you should see a checkbox option
to "Enable auto-zeroing", and a box to enter the timing if this is
enabled.
This option doesn't appear for other sensor types. If you
don't see it, it's because it's not applicable to your sensor.
When auto-zeroing is enabled, the Pinscape software will automatically
reset the software plunger position to the "park" position (the point
where the plunger comes to rest on its own when you're not moving it)
whenever the sensor hasn't detected any motion for the specified time
period.
The point of auto-zeroing is to correct for accumulated errors in the
software's notion of where the plunger is currently positioned. A
quadrature sensor like the AEDR-8300 doesn't actually know
where the plunger is at any given time; this type of sensor can
only detect motion, so it only knows how far the plunger has
moved from the starting point. These distance measurements are quite
precise, but like any sensor, there's always some measurement error,
and little errors add up to big errors over time if you just let them
keep accumulating. Imagine if you had to measure a mile-long distance
with a one-foot ruler: you'd try to carefully line up the starting
point and ending point of each one-foot interval, and take a careful
measurement each time, but you'd always have a tiny bit of uncertainty
in each measurement. After adding up five thousand of those one-foot
sections, the tiny errors would add up to at least a few inches, and
probably several feet. That's basically how a quadrature sensor
measures position: it adds up the net effect of many tiny motions to
figure the overall position.
Auto-zeroing helps avoid long-term error accumulation by periodically
resetting to a "known state", by assuming that a plunger that's been
sitting still for a long period must be sitting at the normal rest
position. When there's no motion for a long period (you can specify
exactly how long that is via the "Auto-zero after" box), the software
simply sets the current internal position counter to equal the park
position.
