38. Plunger Setup on the PC
Most of the popular pinball player programs have support for plunger
devices built in, but they all require you to configure some option
settings to enable the plunger support and fill in the details of your
device. This section explains how to set up Visual Pinball and
Future Pinball, and how to do some simple tests to make sure
everything's working properly.
Windows itself generally doesn't require any special setup to work
with a plunger. Plungers emulate joysticks, and Windows has excellent
plug-and-play support for joysticks built in.
Plunger device basics
Before getting into the details of setting up the software, it's worth
understanding how a plunger device communicates with Windows and the
pinball player software.
At the Windows device level, all of the plunger devices pretend to be
joysticks. The Windows joystick interface defines several "axes" that
report the positions of the moving parts of the joystick. A regular
joystick typically has an X axis and Y axis that report the left/right
and up/down position of the stick. These are reported numerically, on
arbitrary scales; for example, the left/right axis might report
position values from -1000 for "all the way left" to +1000 for "all
the way right". That's just a made-up example; the actual numerical
ranges depend on the individual device, and they're usually in
abstract units that don't correspond to inches or centimeters
or any other real units.
The convention used by all of the plunger devices I know of is to use
the joystick "Z" axis to report the plunger position. For a real
joystick, the Z axis is supposed to represent some kind of vertical
motion of the stick, but that's just a convention; Windows doesn't
know or care what the physical geometry of the device is like. If the
device reports "Z=500", Windows just passes along "Z=500" to any
application software (like VP) that asks.
As with all joystick axes, the numerical range of the Z axis is
arbitrary and abstract. But Visual Pinball does define one special
point on the Z axis: Z=0 (zero) is assumed to be the resting position
of the plunger. That's the position where the plunger sits when it's
in equilibrium, when it's not in motion and when you're not pulling it
back. If you run through the plunger calibration procedure in the
Pinscape Config Tool, one of its jobs is to identify the resting
position and calibrate it so that it reports Z=0.
Visual Pinball and the other pinball programs that know about plunger
devices all use this joystick interface. They look for a joystick
device in the system, and if one is found, they read the Z axis value
to determine the position of the physical plunger. Visual Pinball
uses this to control the simulated on-screen plunger, so that the
simulated plunger action in the game can be controlled by moving the
physical plunger.
Plunger device axis setup
Some plunger devices give you options about which axis to use.
The Z axis is the most common choice, since that's the one that
almost all of the pinball player programs expect you to use.
However, in some rare cases you might need to choose a different
axis to avoid conflicts with other devices.
If your device does use some joystick axis other than the Z axis,
be sure to substitute that axis for the Z axis in all of the
settings throughout the rest of this section.
Testing with the Windows joystick control panel
You can run a really simple test that your basic plunger hardware
setup is working using the Windows joystick control panel. This
is a good early test because it doesn't depend on your Visual
Pinball or Future Pinball settings; it just tests the basic
USB joystick input.
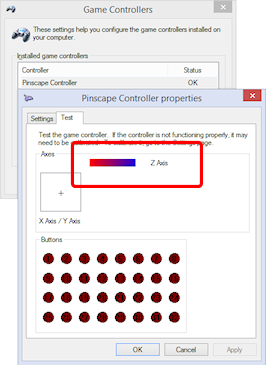
- Press Windows+R
- Type joy.cpl into the Run box
- In the Game Controllers list, double-click on your plunger device
- Look for the "Z Axis" bar on the properties page
- Move your plunger

If all is working, you should see the on-screen Z Axis bar track
the motion of your physical plunger as you move it back and forth.
(If you set up your plunger on the Rz (rotational) axis, there
should be a "Z Rotation" bar instead, and that should track the
plunger motion.)
If the Z Axis (or Z Rotation) bar doesn't move, your plunger isn't
sending USB readings to Windows properly. Go back and check your
plunger hardware settings to make sure they're correct. If you're
using Pinscape, you can use the Pinscape Config Tool's plunger tester
to see the raw input from the plunger, to make sure that the position
sensor is working.
If your plunger device doesn't appear in the Game Controllers list,
make sure it's connected to USB and that it's configured properly
in its hardware settings.
Important: do not calibrate! The Game Controllers control panel
has a "Calibrate" button under the Settings tab that many people see
and think it would be a good idea to click. Don't! This particular
calibration process is designed for real physical joysticks only.
It's unsuitable for plunger/nudge devices and it'll make your device
act erratically. If you clicked the Calibrate button at some point
thinking it would improve matters, you should undo that, by returning
to the Settings tab and clicking "Reset to default". That will erase
the troublesome calibration data and restore normal operation. (This
advice applies to the Pinscape Controller and most of the other nudge
devices I know about, but there might be exceptions. If your device's
owner's manual tells you to use the Windows joystick calibration
despite what I just said, go with the owner's manual's advice.)
VP and FP plunger preference setup
Most of the pinball player programs have option settings that let you
specify whether or not a physical plunger is attached, and if so, how
it should be read. If your plunger isn't working with a given pinball
player program, the first thing to do is check the program's options
and make sure the plunger is enabled and is using the correct joystick
interface.
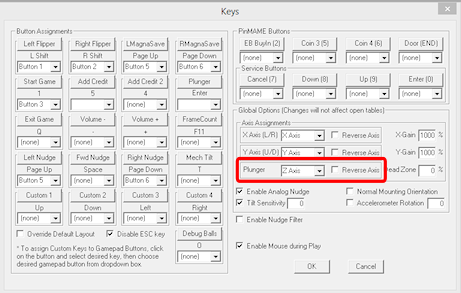
Visual Pinball 9: Open the VP editor. Select Preferences
> Keys from the menu. Find the "Plunger" section. Set the
plunger axis to match the one reported by your plunger device; this is
usually the Z axis. If you changed your Pinscape settings to Rz (or
you're using a different plunger controller that uses something other
than the Z axis), select the appropriate axis here.

VP 9 plunger settings in the Keys preferences dialog
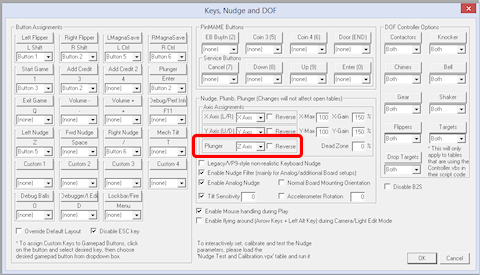
Visual Pinball 10: Open the VP editor. Select Preferences
> Keys, Nudge & DOF from the menu. Find the "Plunger"
section. Set the plunger axis to match the one reported by your plunger
device; this is usually the Z axis. If you changed your Pinscape
settings to Rz (or you're using a different plunger controller that
uses something other than the Z axis), select the appropriate axis
here.

VP 10 plunger settings in the Keys preferences dialog
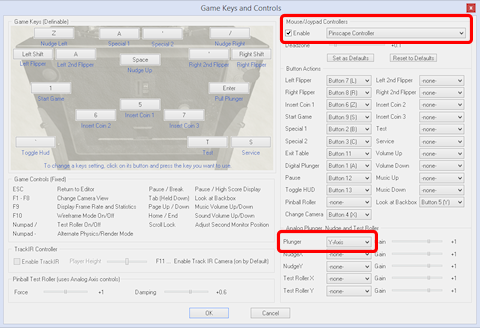
Future Pinball: Open the Future Pinball editor. Select
Preferences > Game Keys and Controls from the menu.
Select your plunger device from the "Mouse/Joypad Controller"
drop list, and make sure the "Enable" box is checked. Find
the Plunger axis setting, and select "Z-Axis" from the drop list.
(Or select the actual axis that your plunger device uses, if different.)

Future Pinball plunger settings in the keys & controls preferences dialog
Testing your plunger with VP or FP
It's a good idea to test a new plunger device with a stripped-down
starter table in each player system, to make sure that the basic
hardware and software setup is working. Once you know the plunger is
working in a test table, you can be sure that any problems you have
with individual tables are those tables' fault, not something wrong
with your basic setup.
You should go through these steps with each player program that you'll
be using, including each version of VP if you've installed more than
one. The preference settings are specific to each program and
version, so it's possible for VP 10 to be working but VP 9.9 to be
broken, or vice versa.
Here are the basic steps to test the plunger device in VP:
- Run VP and go to the blank editor (cancel out of any initial "Open File") dialog
- On the menu, select File > New to create a new blank table
- Make sure the Properties panel is showing on the right; if it isn't, click the Options button in the left tool window
- On the menu, select Edit > Select Element, then scroll down to the Plunger object and click on it
- In the Properties window, make sure Enable Mechanical Plunger is check-marked
- Press F5 to run the game
- Try moving your plunger
If everything's set up correctly, the on-screen plunger should track
the motion of your physical plunger. If the on-screen plunger doesn't
move, go back through the plunger
preference setup steps above.
The procedure for Future Pinball is simpler, because FP doesn't have
an equivalent of the "Enable Mechanical Plunger" checkbox that VP
uses. It's just always enabled. So simply create a blank table and
run it, and test that the on-screen plunger tracks the motion of your
physical plunger.
Fixing individual tables
Okay, if you've made it this far, your plunger is sending joystick
input to Windows successfully and is working with test tables in the
pinball players you're using. Ideally, we'd be done at this point:
just load up some tables and play.
There's just one slight problem with that: some individual tables
might not work properly, particularly with Visual Pinball, and
particularly with VP 9. This is despite the fact that we know that
the plunger input is correctly reaching VP itself. The snag is that
individual VP tables don't always use the built-in VP plunger object,
or don't use it properly for real plunger input. Some tables use
their own improvised scripting code that doesn't take plunger devices
into account.
VP tables that don't work properly with a plunger device can usually
be fixed, sometimes easily and sometimes with a bit of work. That's a
fairly big subject, so we cover it separately in
Fixing VP Plungers.