14. Windows Setup
Once you have the PC hardware set up, the next step is to
install Windows.
We won't try to provide a Windows installation tutorial here, since
the Web has much more comprehensive information on that than we could
provide here - and you probably won't need to look at any of that
anyway, since Microsoft has managed to make the process fairly
automatic in most cases. But we do have some recommendations for
settings specifically for pin cabs.
So continue below after you've gone through the basic Windows
installation procedure.
DON'T turn off UAC
User Account Control (UAC) is a Windows security feature added in
Windows Vista, and present in all Windows versions since, that makes
Windows ask for your permission when an application tries to do
something that affects core resources in the operating system, such as
altering a system registry setting.
You might see advice on the forums telling you to turn off UAC to
avoid those prompts. I recommend ignoring that advice. Leave
UAC enabled.
I recommend against disabling UAC because doing so can cause software
compatibility problems. UAC is an integral part of modern Windows
systems, and removing it actually changes the way Windows works
internally, which can break some application software. If you're
technically inclined and curious about the details, see Mark
Russinovich's article in Microsoft's TechNet Magazine, June 2007,
Inside
Windows Vista User Account Control. For a less technical
explanation, try a Google search for "Why not disable UAC".
Disabling UAC also increases your vulnerability to system damage
from malware and unintentional software bugs.
Any advice you see about disabling UAC is likely outdated. The notion
comes from the early days of Windows Vista, when UAC was first
introduced. A lot of software at the time wasn't properly designed
for the tighter security rules added in Vista, so some people resorted
to disabling UAC in an attempt to keep their old software running.
As time has gone on, though, most software has been updated to work
properly, and UAC itself has been improved to make it less intrusive.
Arrange monitors
If you're using multiple monitors, Windows will combine their display
areas into a single large virtual desktop.
Windows lets you adjust the way the monitors are arranged within the
virtual desktop via a control panel. The idea is that if you have two
physical monitors sitting side by side on a desk, you can arrange the
virtual desktop to match. To reach this control panel, bring up the
Display control panel, then click Adjust Resolution.
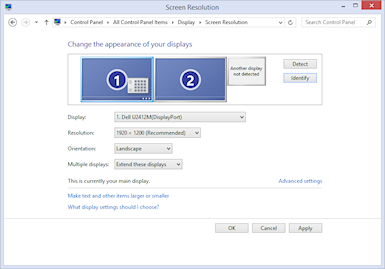
This control panel shows a diagram of how the physical monitors are
lined up across the virtual desktop. You can drag the monitors in
the diagram to rearrange them. How you arrange your monitors is
mostly up to you, but there's one important rule you should
follow:
The main display should be
at the upper left of the virtual display area.
Note that the "main display" isn't necessary display #1. The
numbering is just a way to identify the monitors and is somewhat
arbitrary. The "main display" is simply the one you designate as such
using the "Make this my main display" button in the control panel.
I recommend the following layout:
- Make your playfield monitor the main display
- Arrange the monitors in a single row
- Make sure the main display is at the left end of the row
Some versions of Windows only allow certain monitors to be the main
display, so you might not have the option to make your playfield
monitor the main one. If you can't, you should still arrange things
so that the main monitor is at the left end of the row.
The reason I recommend this arrangement is that some software, notably
VPinMAME, can have odd problems if the main monitor isn't at the left
extreme of the virtual desktop. Windows internally assigns the
"origin" of the pixel coordinate space to the top left of the main
monitor, so any monitor that's to the left of this (or above it) in
the virtual desktop area will have negative pixel coordinates. Some
software (like VPinMAME) gets confused by the negative coordinates.
If you don't follow this advice about the layout, VPinMAME won't be
able to properly remember your screen layout, because it incorrectly
interprets negative coordinates as errors.
Turn off "Sticky Keys"
Most pinball software uses the Shift keys to control the flippers.
Windows has an accessibility feature called "Sticky Keys" that locks
the shift keys on if you press them several times in a row. The
feature is well-intentioned - it's there to help people who have
difficulty pressing several keys at once - but it interacts horribly
with pinball games. It can make the flipper get stuck in the up
position after a bunch of rapid flips.
Sticky Keys is an accessibility feature, so you'll find it on the
"Ease of Access Center" control panel, which you can find in the
main Control Panel window.
On most versions of Windows, you can also find this control panel by
pressing Windows+S ("Search") and typing "Sticky Keys" into the box.
Look for "Change how your keyboard works" or "Make the keyboard
easier to use" in the search results.
Once you find the dialog, look for the checkbox labeled "Turn on
Sticky Keys". Make sure it's un-checked.
Automatic login
Windows normally asks you for a username and password every time you
start up the computer. This is great for office or work PCs.
It's not great for pin cabs, where you want to be able to turn on
the machine and get straight to playing pinball. It's a little crazy
to have to get out the keyboard and log in first.
Fortunately, Windows lets you disable the login requirement, so that
the machine boots straight to the Windows desktop each time you turn
it on. Here's the procedure:
- Press Windows+R ("Run Program")
- Type netplwiz into the Run box and press Enter. This should bring up the advanced user accounts control panel (titled "User Accounts" on most Windows versions).
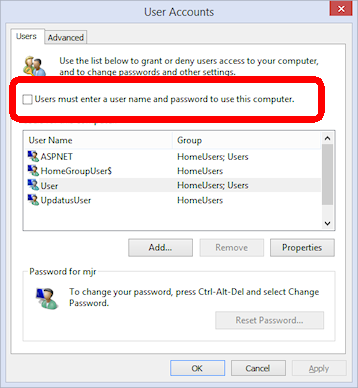
- Look for the checkbox "Users must enter a user name and password to use this computer" (circled on the screen shot above). Un-check this box.
- Click OK to confirm the changes.
- A new dialog should appear asking you to enter the credentials to use to sign in automatically when Windows reboots. Enter the username and password you wish to use and click OK.
The next time you boot, Windows should automatically log in to
the account you selected and go straight to the desktop.
Remove (or don't install) anti-virus software
On any gaming PC, it's best to minimize the number of background tasks
running. Background tasks take CPU time away from the main program
that's running. This can have a visible effect on the animation in a
game, since even a very short interruption in the animation updates
can cause momentary glitches and stutters.
Probably the most important background task to get rid of is
third-party antivirus or anti-malware software. Virtually all of
these programs use significant system resources and will noticeably
hurt game performance. If you built the PC yourself and did a fresh
install of Windows, you can simply elect not to install any
third-party security software. If you bought a pre-built PC, and the
vendor larded it up with "free trial" security software, I'd remove it
all.
It might seem crazy in this day and age to run a PC without any
security software, and I certainly wouldn't recommend going without on
an ordinary PC, but a pin cab isn't an ordinary PC. The difference is
that you'll probably only use it for playing pinball - not for
browsing random Web sites, opening random emails, or downloading
random programs. As long as you're careful about what you install,
your risk of encountering any malware should be small. Stick to the
well-known pinball programs and add-ons, and always get them from
reputable sites.
An exception: you can (and should) leave the built-in Windows
security features enabled, particularly Windows Defender and the
Windows Firewall. Those have a negligible impact on system
performance, and they provide a good baseline level of protection.
Backing up your system data
Everyone knows how important it is to back up the data on a PC, in
case you ever need to recover from hardware failures, accidental file
deletions, or malware attacks. It's a lot of work to set up all
the software on a pin cab, so backups are as important for a pin cab
as for any other PC.
The approach I've used for a long time is to back up to external USB
hard disks. Those are reliable and fairly inexpensive, and most of
them come bundled with backup software. More recently I've added
cloud backup as a second layer of protection. There are several good
on-line backup services that run about $10/month for reasonable
storage quotas.
Here are some things I consider important when setting up your
backup plan:
- It should be automatic. It should run on a schedule so that you don't have to remember to run it yourself. It's too easy to put it off or forget about it entirely if you have to do it manually. The cloud backup services make this particularly easy.
- The media should be offline between backup sessions, meaning not physically connected computer you're backing up. This will protect your data in case of a hardware failure (such as a power spike that fries everything connected to the computer) or a system-wide malware infection. If you back up to an external USB disk, simply unplug it from the computer after each backup.
- Better still, the media should be off-site, at a physically separate location. This will protect your data in case of a whole-house disaster like a fire or flood. This is a big benefit of cloud services.
- Backups should be versioned. Versioning is particularly critical for malware protection, because an infection might not be immediately apparent, so your most recent backup might include infected files without your knowing it. Keeping multiple versions lets you go back in time to a point before the infection. Versioning is also a nice safety net in general - it lets you go back to an older working configuration if something goes wrong with a software update, for example.
- The backup software should do a whole-disk scan. If you have to manually choose the files that get backed up, you'll inevitably miss something important. I always prefer starting with a default that includes everything on the disk, and then manually selecting files to exclude.
- The backup scan should include the Windows registry as part of the backup, since Windows itself and many application programs store a lot of important configuration data there.
