Appendix 11. A Few Woodworking Tips
I'm such a woodworking newbie that I'm a little shy about including a
section on "tips". But I'm doing it anyway, because I've come across
a few useful things that don't seem to be widely advertised, and I
want to pass them along. This isn't even remotely a tutorial on
woodworking - it's just a few miscellaneous ideas that I've found
helpful.
I picked up most of the tips here from Web tutorials and Youtube
videos. You can easily find these tips and much more with a little
online research. But the Web is vast, so sometimes it's nice to have
a curated list of highlights from someone who's not just trying to pad
out a listicle.
Measuring and marking lines
If you're accustomed to marking measurements on a board with a little "tick"
mark with a pencil, here's a slightly different method that's no more
work, but really improves my accuracy.
- Put your pencil tip right against the mark on the tape or ruler at the point you want to mark
- Make a diagonal stroke out to the right
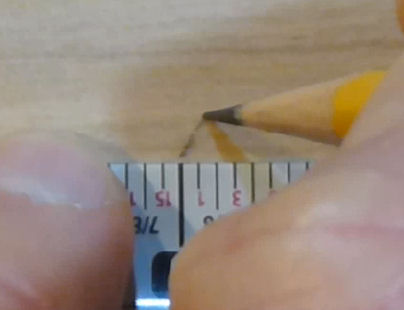
- Put your pencil tip back at the same tape/ruler mark
- Make a second diagonal stroke out to the left
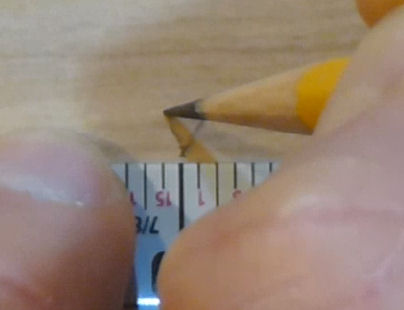
Now you have a little "V", with the point of the "V" exactly at the
measured location.
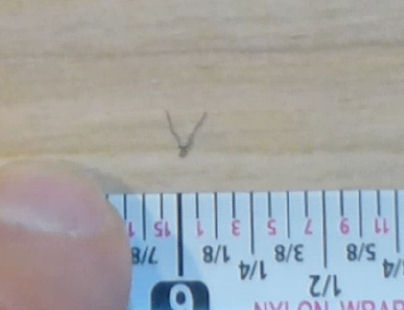
The repeatability of my measurements improved noticeably when I
starting using this technique. The old tick mark method leaves a
surprising amount of fuzziness, mostly because the little line is
never perfectly straight (not when I draw it, anyway). The "V" marks
a single point, instead of a line, so you can see exactly where
the measurement was supposed to be.
Tape measures
The best measuring tool for many woodworking tasks is a tape measure.
I used to think rulers were better when you needed an accurate
measurement, but a tape measure is actually better for woodworking in
many cases, if you use it right. The key is the little hook on the
end.
When you want to measure from the edge of a board, hook the tape onto
the edge you want to measure from, and pull the tape tight across the
board to find the point to mark. The hook sets the zero point exactly
at the edge of the board. This is much more precise than trying to
align a ruler with the edge.
Here are two tips for getting better accuracy out of your tape measure:
- The little hook on the end of the tape is supposed to be loose like that. I always thought the looseness in my old tape measure was from age - I thought the little rivets holding the hook on had loosened up over time. But the sliding hook is actually a feature, not a bug. It's there to precisely account for the thickness of the hook itself. When you attach the hook to the outside edge of a board, pull it tight, and the hook will align so that your reading on the tape corresponds to the distance from the edge of the board. When you're measuring the inside of a space, push the hook up against the wall you want to measure from, so that the hook slides all the way inward, and now the reading on the tape is precisely the distance from the thing it's pressed up against.
- Use the same tape measure for all measurements that have to
align with each other or be consistent with each other. Tape measures
(and rulers as well) can have a fair amount of variation when you
compare them side by side - it seems typical to see differences
of 1/32" to 1/8" over distances of a few feet. Even a variation
as large as 1/8" over 3' is better than 99.5%
accuracy, which is great in most contexts, but those fractions
of an inch can really matter in woodworking. Anyway, you can
make those errors cancel out in most cases simply by using the
same tape measure for all related measurements. That way, at least the
readings will all be off by the same amount, so they'll line up
with each other after cutting.
By the same token, if you need a measurement to line up with some pre-fab part (a metal trim piece, say), measure that part with the same tape measure rather than relying on the specs. Or just use the part itself as a ruler. Don't count on every part to match the specs perfectly; a lot of this stuff isn't manufactured to the highest precision.
Buying tip: I find it really helpful to have a tape where every tick
mark on the tape is marked with a number. I have an older tape that
only has numbers on the inch marks, and a newer tape with every 1/16th
tick mark individually numbered. I've made more mistakes than I'd
like to admit reading the old tape, where I misread a 1/16th tick
because I wasn't paying close enough attention or I didn't have good
enough lighting. It's harder to screw that up when the number is
printed right on top of the mark you're reading.
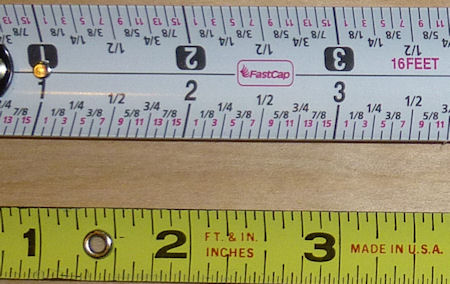
Comparison of tape measure markings. Every 1/16" mark is
numbered on the top tape. On the bottom tape, only the
inches are numbered, and you have to infer the fractions -
which isn't exactly hard, but it's more error-prone.
On the other hand, the bottom tape is narrower, which
makes it easier to hold the edge flat against a board
to precisely line up a mark. My ideal would be a narrow tape like
the bottom one with every tick mark clearly numbered
like the top one.
Sawing on the "right" side of the line
If you start with a board that's 12" wide, and you use a saw to cut it
exactly in half, how wide are the two resulting pieces? Strangely, the answer
isn't 6". It's actually more like 5-15/16". What happened to the
missing 1/8"? It basically vanished into thin air. Well, almost: it
got converted into sawdust. The technical term for this is the "kerf" of
the blade - the width of the slit that the blade makes as it cuts through the
board. You can easily see this in action by making a cut partway
into a board.
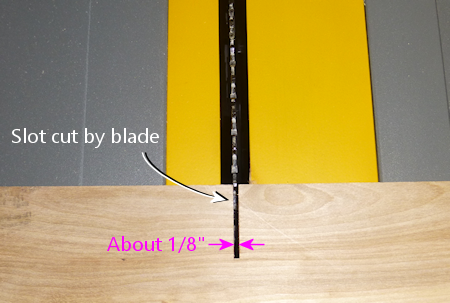
Partial cut, showing the slit that the saw leaves as it cuts.
Woodworkers call the width the "kerf" of the blade.
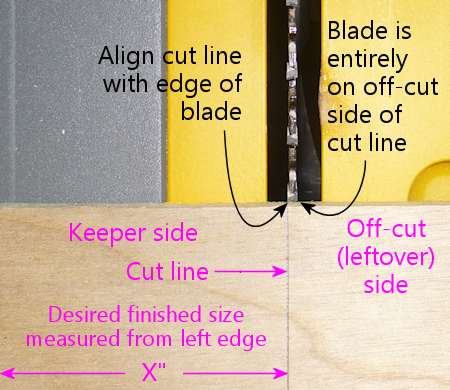
The usual goal when you're sawing a board is to produce a finished
board that's an exact target width. You don't want it to be "about"
the desired width, give or take a few sixteenths. You want the result
to be just what you measured.
The way to get the finished board to match the measured size is to
place the blade on the outside of the cut line. In other words,
position the saw so that the entire width of the blade is within
leftover part of the board. Align the inside face of the saw
blade (the face closer to the keeper part of the board) with the cut
line. That way, the slit that the saw cuts will be taken out of the
leftover part, leaving exactly the measured size for the keeper part.
How you apply this varies a little bit with different types of saws:
- For a table saw, making a rip cut using the fence, the keeper part is the side that goes against the fence. The fence gauge should always be calibrated to the distance between the fence and the blade, so the reading on the gauge should reliably give you the width of the finished piece that comes out of the saw on the fence side.
- For a cross-cut with a table saw, using a sled or miter gauge (rather than the fence), mark the cut line on the board, and align the cut line against the saw blade so that the whole width of the blade is on the leftover side of the line.
- For a track saw, mark the cut line on the board, and position the track so that it's on top of the keeper side of the board, with the edge of the track right up against the cut line.
Drilling clean holes
The big problem that everyone encounters when drilling plywood is
splintering on the back side of the board, where the bit exits.
This seems to be a vexing problem for a lot of people, given the
bounty of How To pages about it on the Web. The usual advice is to
always use brand new drill bits, or to use special bits like stepped
bits or Forstner bits. It's hard to argue with the notion that a
sharp bit will drill cleaner than a dull one, but it's hard to imagine
anyone actually follows advice that you should treat your drill bits
as single-use disposables. And the special bits have their uses, but
none of them can fix the back-side splintering problem by themselves.
The splintering happens because of the way plywood is constructed, not
because of the type of drill bit you're using.
Another approach you often see recommended is to drill halfway through
from each side, meeting in the middle. This avoids back-side
splintering by essentially eliminating a back side. That can indeed
fix the splintering problem, but I've found that it often creates a
new problem, which is that it's difficult to get the two half-holes to
align perfectly. There's usually at least a tiny offset between them,
no matter how careful you are. You can pre-drill with a small pilot
bit to mark the center point on both sides, but even then, the
accuracy is limited to the non-zero size of the pilot hole. In some
cases, a slight offset might not matter, but it can be problematic
when precision is required, such as when you need a good fit for a
bolt.
What actually works: There's only one technique I've found that
really works, and the good news is that it works reliably, with almost
any drill bit. It's also pretty easy. The technique that works is to
use a backing board. In other words, take a piece of flat
scrap material that you don't mind drilling an extra hole in, and
clamp it tightly to the back of the board, behind where you're
drilling the hole. Tight clamping is the key - it's what makes this
work. Now just drill straight through from the top side.
The whole reason splintering happens in the first place is that the
veneer tends to bend outwards just before the bit penetrates it. As
the bit gets close to breaking through, it cuts away at the veneer
from the inside, making it thinner and thinner. This reaches a point
where the veneer is so thin and fragile that the pushing force of the
bit overwhelms the cutting action, bending the super-thin fragment of
veneer outwards instead of cutting it. The wood grain holds this bit
of bending veneer together and pulls it up and away from the board for
some distance away from the hole, resulting in those torn splinters
around the exit point of the drill.
The backing board fixes this by providing an extra layer of strength
outside the veneer that holds the veneer flat until the bit is all the
way through.
I almost always get clean holes on both sides of the board when using
this technique, as long as the backing board is clamped tightly
enough. This works for regular spiral bits, Forstner bits, and hole
saws.
Cutting rectangular openings
It's easy to cut a rectangular opening with a jigsaw, but I've never
been able to get professional looking results. My jigsaw cuts always
end up at least a little crooked. I get much nicer results with a
router and an edge guide, but it's extremely tedious to cut a large
opening in a thick board this way, because you have to make multiple
passes. You're only supposed to route about 1/4" of depth at a time.
The router also produces a ridiculous amount of sawdust.
The best solution I've found for cutting large openings is to combine
the jigsaw and router methods, in a two-step procedure:
1. Make a rough cut with a jigsaw, leaving a safety margin of
perhaps 1/8" inside the bounds you want to cut
2. Finish each side with a router and a straight bit, using an edge
guide to get a straight line at the final boundary
For the initial cut with the jigsaw, drill holes near the four corners
big enough for the jigsaw blade. Make sure that the holes are inset
from the final corners far enough that you don't drill any material
outside the lines. Now use the jigsaw to make a rough cut along each
edge, staying well within the final outline. The point is to maintain
a safety margin so that if the jigsaw swerves off course, you'll be
able to stop it before it cuts anything outside the final outline.
Any jagged lines at this point don't matter because they're all inside
the interior of the cutout, which is going to end up being entirely
removed when we're done.
After the rough opening is finished, you can use the straight
router bit to trim back each edge to the final cut line. You can set
the router bit height to the full thickness of the board, since we
don't have to make a "plunge" cut into the board. We're just going to
nibble away at the edge until we reach the cut line. This is what
makes this approach faster than doing the whole thing with the router
bit: when using just the router, you have to make the cut in 1/4"
depth increments, because router bits can burn the board if you try to
cut deeper than that all at once. But this way, we're going in from
the side instead of straight down, so we can do a little bit at a time
sideways instead of a little bit at a time in depth.
For the routing steps, I work on one edge at a time. I clamp a
straight edge to the work piece to serve as the guide, parallel to the
cut line, offset by the distance between the router bit and the
outside of the router base plate. The guide can simply be a straight
piece of plywood, or any other good straight edge, such an aluminum
level. You can measure the distance on the router itself, but I find
it works much better to make a test cut against a straight edge and
measure the distance between the straight edge and the cut. Then you
just position the straight edge the exact same distance from the line
you want to cut. Clamp it to the board. Position the router bit in
the jigsaw opening, making sure it's in a completely open area, not in
contact with any wood at this point. Turn on the router and let it
come up to speed. Gently and gradually move the bit into the target
edge, until the base reaches the straight edge. Slowly move the
router along the straight edge. Stop a little short of the corners,
to make sure you don't put a dent into the corner that goes outside
the box. Repeat for each edge.
By the way, this technique also works for other shapes with straight
edges, such as the triangular(-ish) cutout for the plunger in the
front wall of a pin cab.
There's a right direction when routing
Routers have a preferred direction for moving them across a work
piece. I didn't really appreciate what this meant even after reading
about it in my router's instruction manual, but it's actually kind of
important.
With most routers, you're supposed to move the router clockwise when
you're routing the inside of an opening, and move it counter-clockwise
when routing outside a perimeter. (Check your router's manual to make
sure it agrees, but I think it's universal - it's a function of the
bit spin direction, which I think is standardized across all
manufacturers.)
The preferred direction is important because it stabilizes the
router's motion, helping you keep the router under control. When the bit
contacts the work piece, it applies a force to the whole router.
Moving in the preferred direction helps directs this force for good
rather than evil - it tends to push the router towards the work piece,
which keeps the motion stable and under your control. If you move the
router in the backwards direction, the contact force can make the
router kick and jerk away from the work piece, often with enough force
to momentarily overwhelm your steering guidance. Apart from the
obvious danger of injury, this can easily ruin the workpiece by jerking
the router away from the intended cut line.
I keep a cheat-sheet with a diagram of the rule on my workbench, so
that it's in view whenever I use the router.
