22. Cabinet Art
If you're building your machine's cabinet from scratch, you'll want
to decide on what the exterior will look like. This might be a simple
flat black paint job, or you might prefer full-color graphics like
on a modern real pinball machine.
Real pinball machines have always featured eye-catching cabinet
artwork. The motivation was always commercial, of course - the art
was there to grab your attention and entice you to drop in a few
quarters. But that didn't mean it wasn't also art. Pinball has a
recognizable graphics style - actually, several different styles over
the decades, but each recognizably "pinball art". It's natural for
virtual pin cab builders to want to tap into that by using artwork
that would look at home on a real pinball machine.
Reproducing the authentic pinball art style can mean different things,
depending on which era you're talking about. Machines built in the
1950s through 1970s tended to use abstract graphics, painted in three
or four bold colors with stencils. The stencil artwork continued into
the 1980s, but the graphics became more intricate and representational.
In the 1990s, the manufacturers started using a multi-color
silk-screening process, which allowed for higher-resolution graphics
with more detailed designs.
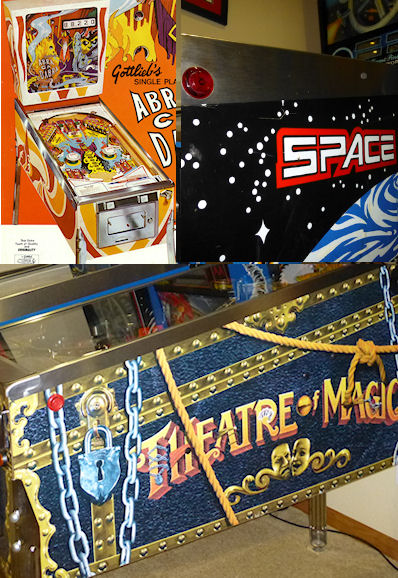
Top left: Gottlieb's Abra Cadabra (1975), with abstract
stencil graphics typical of machines built in the 1950s through 70s.
Top right: Williams's Space Station (1987), with the more
intricate stencil graphics of the 1980s. Bottom: Bally's
Theatre of Magic (1995), which used the high-resolution
silk-screen graphics typical of the 1990s.
In the 2000s, the remaining manufacturers switched from screen
printing to plastic decals. Decals are cheaper to produce, but they
also offer more options to the designers, since they can be printed in
high resolution and full color. (Silk-screening's palette is limited
by the number of color layers used, and has to use half-tone patterns
for in-between colors.) The switch to decals opened up even more
options for art designers, including full photo-realism.
When to install artwork
I think it's best to paint or install decals just after completing the
assembly of the wood cabinet, before installing any of the interior
equipment, and certainly before installing the trim.
I'd wait until after assembly to do any decorating, because that lets
you do a final pass with a power sander to even out surfaces, smooth
corners, and remove any excess glue. It also eliminates the risk
of scratching or marring the artwork during the assembly process.
It's better to paint and install decals before installing any interior
equipment, since that will add weight and make the cabinet harder to
move around. You'll want to be able to flip the cabinet onto
different sides while working on paint or decals, so you don't want it
weighed down with internal parts.
Virtual pin cab design options
As a virtual pin cab builder, you have several good options available.
The right option is a matter of taste and budget.
Natural wood style. This isn't common, but some people choose
to make their cabs look like a piece of fine furniture or cabinetry,
to better fit into a home environment. If you want this kind of look,
you can use a wood stain or a natural clear finish with cabinet-grade
plywood. You can even buy pre-finished plywood to skip the staining
step.
Single-color painting. This is another simple, understated look
that some people use to make their machine relatively inconspicuous
for the home environment (as inconspicuous as a six-foot-tall,
five-foot-long, three hundred pound wood box can be, anyway). The
most common single-color paint job is solid black, since that tends to
disappear into the background nicely.
Stencil graphics. To a lot of people, the electromechanical era
(1950s through 1970s) is the Golden Age of pinball, and tables from
that era define what a pinball machine is supposed to look like. To
be sure, the EM era's graphical style is unmistakeably distinctive,
and it's iconic of pinball in popular culture. The stencil graphic
style that these machines used is also something that you can
reproduce on your own, at low cost and without any special equipment.
You just need to make a stencil mask out of cardboard and masking
tape, and then apply spray paint in as many colors as desired.
Full-color decals. Many pin cab builders want to reproduce the
look of machines from the modern era (1990s and onwards). These
machines use elaborate designs printed in full color at high
resolution. The real machines from the 1990s used high-res screen
printing; newer machines almost all use plastic decals to achieve the
same look. Happily, professional custom decal printing is readily
available for one-off print jobs, and is even relative affordable.
This isn't something you can do at home with DIY equipment, since it
requires special industrial printers, but there are lots of print
shops that have the equipment and can do the job for a reasonable fee.
And since the printing is done on what's essentially a giant
industrial version of an ink-jet printer, you can print virtually any
custom design by preparing the graphics with a PC photo editor
program.
Using decals
Most pin cab builders these days opt for decals, since they allow for
such unlimited creativity in the artwork.
First-time cabinet builders are sometimes skeptical about decals,
thinking that they'll look like cheap stickers. It might reassure you
to know that most of the newer real machines now use decals for their
artwork, using the same materials that a good print shop would use for
your cab decals. If you can find a newer Stern machine to look at,
you can get a first-hand look at what kind of finish you can expect.
When printed on quality stock and applied properly, you can achieve a
finish that's pretty close to the screen printing used in the 1990s
machines. Decal printing is actually superior in some ways; you get a
wider color gamut and finer dot pitch, and the plastic finish is more
resistant to light scratches.
Surface preparation for decals
You should check with your decal vendor for advice about surface
preparation. I'd always give your vendor's advice priority over any
generic advice you see on the forums or in build guides like this one.
Different vendors use different film stocks, and what works best for
one type might not be ideal for others.
With that in mind, I'll give you my own generic advice, based on
working with a couple of different decal sources.
The first question is whether or not to paint before applying decals.
I say yes, mostly because I want to make sure that any exposed wood
areas around the edges of the decals match the decal background color,
to hide the transition. Paint can affect how the decals adhere, so if
your vendor says you should or shouldn't paint, I'd follow their
advice; but if they say you can go either way, I'd paint.
Note that paint is probably required if you use a grain filler (which
we'll come to shortly). Grain fillers don't adhere strongly on their
own - they have to be sealed with paint or lacquer.
If your cabinet is built with plywood, the second question is how to
prepare the surface, apart from the optional painting. No additional
prep is necessary for MDF or MDO plywood, since the factory finish is
paper-smooth. With regular plywood, though, the veneer has visible
wood grain. Vinyl decals adhere so tightly that the wood grain will
be visible through the decals if you don't take some additional steps.
Wood grain showing through the decals isn't really a problem, but most
of the commercial machines have a smooth finish, so I prefer to
minimize it for a more "factory" look.
I think the only way to achieve a grain-free finish is to use a wood
grain filler product before painting. My experience is that sanding
alone won't completely eliminate the grain texture, no matter how much
sanding you do or how fine the grit, because sanding won't eliminate
the pores in the wood grain. The pores are what make the grain show
through paint and decals, because they absorb the paint unevenly.
Wood grain fillers are specifically designed to fix this by plugging
up exposed pores at the surface, so that paint is absorbed more
uniformly.
Some pin cab people have reported good results using paint alone.
I've had less than perfect results that way myself, and all of the
kitchen cabinet pros seem to agree that grain fillers are a must if
you want a piano finish, but maybe it's a matter of finding the right
paint. It would certainly save a lot of labor to skip the filler
step. Some paints, particularly primers, do make claims that they can
serve as a surface defect filler.
If you do decide to use a grain filler, you can find lots of how-to
videos about product selection and application procedures on the Web.
Most of the videos I've found are focused on painting kitchen
cabinets, so that's a good search term to use, but the same techniques
work on pin cabs. If you want to skip the video research, here's a
procedure that has worked well for me. It's time-consuming, but it
doesn't require any special expertise or equipment.
- Sand the bare wood until smooth to the touch, with a power sander and 320 grit sandpaper
- Apply grain filler. I've had good results
with Aqua Coat White Cabinet Grain Filler. Many people say that
drywall compound (any brand) works just as well. If you use a
grain filler, follow the manufacturer's instructions, but I
think the basic procedure is the same for any of these products:
- Work in small sections of a couple of square feet at a time, so that the filler doesn't dry out before you finish working the area
- Apply a big glob of filler
- Using a squeegee or gloved hands, work the filler back and forth across the grain, pushing it down into the grain
- Immediately scrape off the excess using a stiff plastic squeegee or old credit card, scraping with the grain; scrape off as much as you can, leaving just what's trapped in the grain
- Continue working in sections until you finish the whole panel
- Let it dry (for Aqua Coat, 45-60 minutes)
- Hand-sand very lightly with a fine-grit sanding sponge (e.g., 3M SandBlaster 320 grit) until the surface feels smooth. (This produces a lot of very fine dust. Wear a good respirator, and do it someplace where you don't mind getting dust everywhere.)
- Repeat the steps above for a second coat; this one should take much less filler, since most of the open grain will already be filled from the first coat
- Repeat for a third coat, or as many more coats as necessary until the grain is well concealed
- Let the last coat dry overnight, and lightly hand-sand smooth
- Clean off all surface dust by wiping and/or vacuuming (avoid moisture here, since most grain fillers are water-soluble - damp cleaning might undo all of your work so far)
- Apply two coats of a filler primer paint. I've had better results spraying than brushing (in my case, using spray paint in a can: I used Rust-Oleum Filler Primer on my last build, and that worked pretty well). My experience with brushes and rollers is that both can leave a texture that shows through the decals.
- Optionally, sand very lightly with fine or ultra-fine sandpaper or a sanding sponge (400 grit or higher). Think of this more as polishing than sanding. You're just trying to smooth out dust bumps and air bubbles. I've had better luck not using a sanding block for this - it seems too easy to make scratches that way. Instead, I just use a small piece of sandpaper, hand-held. Work in small areas and check progress frequently by touch.
- Wipe clean again with a slightly damp cloth. Apply two or more top
coats of paint that matches the background color of your decals.
After each coat fully dries, you can do another extremely light
polishing/sanding pass. It's really important to let the paint dry
long enough to fully cure and harden before sanding, otherwise the
paint can ball up and come off in little chunks, defeating the whole
purpose. Check the instructions on the paint can for full drying
time.
A lot of people like to do the sanding between coats as wet sanding (dipping the sandpaper in water, or water with a tiny amount of mild soap). Only do this with with oil-based paints. Wet sanding can create an even smoother finish and helps avoid scratches.
Applying decals
Decal application is scary the first time you do it, especially since
the decals are expensive, and there are at least a few horror stories
on the forums about how difficult decals are to work with. But it's
one of those things where you don't need special magical skills. If
you follow the right procedure, you should be able to get good results
reliably.
There are two basic techniques: the "wet" and "dry" methods. This is
one of those topics that inspires an almost religious fervor in a lot
of people: proponents of the wet method will tell you that you'd have
to be crazy to even think about the dry method, and advocates of the
dry method will say the same thing if you're contemplating the wet
way.
The "wet" method involves spraying the cabinet surface and the back of
the decal with a soapy solution just before application. Some decal
film stock requires this as a way to release trapped air bubbles, but
newer, higher-tech decal materials are designed with tiny pores that
release air bubbles on their own, eliminating the hard requirement to
use the wet method. Even so, some people still like the wet method
for a whole separate reason, which is that it keeps the decal from
attaching too strongly at first, so that you can slide the decal
around to fix any initial alignment errors.
The "dry" method simply applies the decal directly to the clean, dry
surface. Newer films don't need any help releasing small air bubbles, so
there's no need for soapy sprays. The decal adheres strongly right
away with this method, so you don't get to slide it around to play
with alignment - but you shouldn't have to do that if you use the
right procedure, because you'll get it aligned beforehand.
You can find Youtube videos for both methods. This is a good
subject to preview on video so that you can get a little mental
practice before attempting it. Search for "pinball decal dry
method", for example.
As with surface preparation, I'd always take your vendor's advice on
application method over anything generic that you see in the forums or
from me. Some media might simply require the wet method, because
of the air bubble issue that affects some film types.
On the other hand, some decals might not be able to tolerate too
much added moisture.
Personally, I prefer the dry method. It's the one that my decal
vendors have all recommended, and it seems simpler and cleaner to me.
I can understand the appeal of the do-over potential of the wet
method, but at the same time, it seems prone to a little less accuracy
exactly because of the slipperiness.
The key to making the dry method work is to lock in the alignment
before you expose the adhesive. Here's the procedure I use:
- Before starting, have a felt squeegee ready. Some people like the really large ones that can go across the whole width of the decal, but a small one works too - the one I use is 4" wide.
- Wipe down the cabinet surface and the back of the decal (don't peel it - I'm just talking about wiping down the back of the backing paper). A clean soft cloth with a little bit of rubbing alcohol works well for this. The point of cleaning the back of the decal is that you're going to have to lay it across the cabinet surface, so any dust on the back of the decal can transfer to the cabinet surface, undoing your careful pre-cleaning.
- Initially, leave the backing paper in place, and get the decal aligned exactly how you want it on the target surface.
- Once it's lined up correctly, temporarily fix it in place at one end, using clamps or masking tape. Make sure to tape it or clamp it securely, so that this end of the decal can't move.
- Lift the other (unpinned) end, making sure that the fixed end of the decal stays stuck in place. Peel the backing away from the free edge for about two or three inches.
- Cut off that first two-to-three inches of backing with scissors or a utility knife. Leave the rest of the backing in place.
- Working from the pinned end towards the free end, smooth the decal flat against the surface again. The exposed section will now adhere to the surface. The decal is now serving as its own anchor at this edge.
- Remove the clamps or masking tape.
- Working from the end that's already stuck, lift the decal enough that you can start peeling off the remaining backing.
- Peel off a little bit of backing at a time, and smooth the decal
onto the surface as you go, using your felt squeegee. Just do a
couple of inches at a time. If your squeegee is the 4" type,
sweep it back and forth across the width of the newly stuck section.
If it's the super-wide type, just keep moving it down the length
of the decal.
It's really important to keep the unstuck part of the decal straight throughout this, so that it doesn't form any wrinkles and doesn't stick to itself anywhere. Maintain light tension on the free end.
Trimming edges
Most print shops will print the decals slightly larger than the final
size you want to install, usually about an extra inch on each side.
This is intentional; it's to give you a little room for error in the
final alignment.
The standard procedure is to align the decals, affix them, then go
around the edges with an X-Acto knife to trim the decals to be exactly
flush with the edges. This is surprisingly easy; you just let the
edge of the wood guide the knife. As long as the knife is sharp,
it should make a perfect cut exactly at the edge.
Cutting out holes
When you design and apply the decals, you should simply let them cover
the holes in the cabinet for the flipper buttons, front panel buttons,
and coin door cutout. After installing, use an X-Acto knife to trace
around the edge of each opening. Cut from the outside, and let
the edge of the opening guide the knife - the same procedure used to
trim excess material around the edges.
Finding a printer
My decals were printed by Brad Bowman a/k/a
Lucian045 on
VP Universe (also reachable at
bjbowman045@gmail.com). I
highly recommend him. Brad is a serious virtual pinball enthusiast
who also happens to run a professional sign printing shop. It's great
to work with a printer who knows how pin cabs are set up, because that
means he'll be able to picture what you have in mind for any special
customizations. The decal stock that Brad uses is also just great:
very easy to work with and very durable. I of course can't guarantee
that Brad will still be offering print services by the time you read
this, but you can always drop him a line to find out.
Other options include VirtuaPin and
GameOnGrafix.com. Both
offer custom decal printing. VirtuaPin specializes in pin cabs and I think
they use similar print stock to what Brad Bowman uses. GameOnGrafix
is more oriented towards home-brew video game cabs, but they also
provide a template for pinball cabinets, and anyway it's basically
the same sort of decal for either type of machine.
You can also try any shop that does commercial sign printing. This is
a common commercial service, so you can probably find local vendors in
your area, especially if you live near a major city. The type of
adhesive plastic material used for pin cab details is also commonly
used for commercial signage.
Artwork requirements
Most print shops will expect you to provide your artwork in an
electronic format, such as JPEG or TIFF. Check with your vendor for
their requirements and recommendations. You should be able to use
just about any photo editor or painting program on your PC to create
the graphics and convert them into the vendor's preferred format.
Decal printing is essentially the same as printing on a home ink-jet
printer. The only real difference is that the decal prints are
physically a lot larger. So keep in mind that the pixels you see on
the computer screen will be spread out over a much larger area when
printed. Images that look smooth and sharp on-screen might be fuzzy
with jagged edges when blown up to pinball decal size. To look good
at full size, the final image will need a pixel resolution of about
300 dots per inch (dpi) when printed. The side panels of a full-sized
pinball machine are about 50" x 24", so if you want to fill that space
at 300dpi, you'll need the source image to be about 15,000 pixels by
7,200 pixels - about 100 Megapixels.
Creating your artwork
There are three main options for creating your artwork.
Design it yourself. If you're feeling creative and you're good
with a graphics editor like Photoshop or Illustrator, you can design
your own original artwork.
Opting for a completely original design gives you the freedom to
come up with whatever look appeals to you. But starting with a blank
page is also pretty intimidating. Here are some ideas for where
to begin:
- If you want to create something in the style of the real machines, start by choosing an era. Go to IPDB and browse through pictures of machines from the era, to get a sense of the prevailing graphic style. If a particular machine's design strikes you as particularly appealing, use that as your starting point.
- Choose a name for your machine. That will automatically plant some ideas about its theme. A lot of pin cab builders name their machines after their favorite movie, TV show, or comic book character, following the long tradition in the real machines of using licensed themes.
- A popular motif is to focus on the virtualness of the machine and/or its ability to run many different games: "Multiball", "Megapin", "Pinball Holodeck", "Pinball Matrix", etc.
- Another way to emphasize the multi-game aspect of a virtual cab is to use a collage of prominent artwork elements from your favorite real pinball machines, such as Rudy from Funhouse and the Addams family characters from The Addams Family.
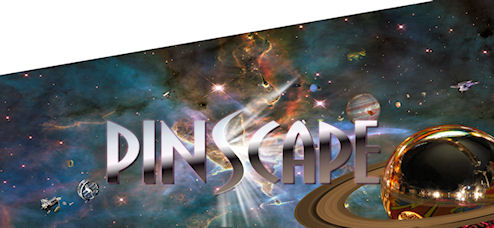
- There's a lot of public-domain (copyright-free) artwork on the Web that you can use as a starting point. For example, if you like space themes, check the NASA, JPL, and Hubble Space Telescope Web sites for some very pretty, high-resolution astronomy images that are free to use. I used a Hubble photo of the Carina nebula as the backdrop for my own cab side art. (Do be sure that any images you take from the Web are truly public-domain or licensed for free use. Reputable print shops won't accept artwork that you don't have the proper rights for.)
Commission original custom art. If you're not interested in
creating your own artwork, but you still want something original, you
can find an artist to create something custom for you. For example,
stuzza on vpforums creates original art for
forum members, for a fee. A stuzza design is generally a pastiche of
pop culture clip art based on a theme you provide. See the
long-running thread
"Cabinet
Artwork I have created" for his contact information and examples
of his work. VirtuaPin also
offers custom graphic design services for a fee.
Use a pre-made design. Stuzza on vpforums has also released a
number of free designs that you can download and use without a
commission fee. See the "Cabinet Artwork" thread mentioned above for
links. I've also come across occasional pin cab artwork
elsewhere on the Web; try an image search for "pinball cabinet side art".
Reproduce artwork from a real pinball. Some cab builders opt to
use the original artwork from their favorite real machine. Be aware
that the graphics from virtually all historical commercial machines
are still under copyright, so a reputable print shop won't accept an
order that reproduces a real machine's artwork without proper
clearance from the rights holders, which almost always requires paying
a license fee. VirtuaPin sells
authorized reproductions of the original art for several popular
classic pinball titles. You can also find ready-to-use decal sets
with reproduction artwork from many more titles from pinball supply
vendors - search for "pinball cabinet decals".
Backbox warning label
Most commercial machines display a big block of warning text on the
back of the backbox, warning operators to bolt the backbox properly
and fold it down for transport. The warnings were there for the usual
legal liability reasons, so if you're just building a cab for your
own use at home, you can leave the area blank. But some cab builders
might like to include the warnings for the sake of meticulous
re-creation of the originals. See
Extras - Backbox warning
label for a picture of the typical text.
