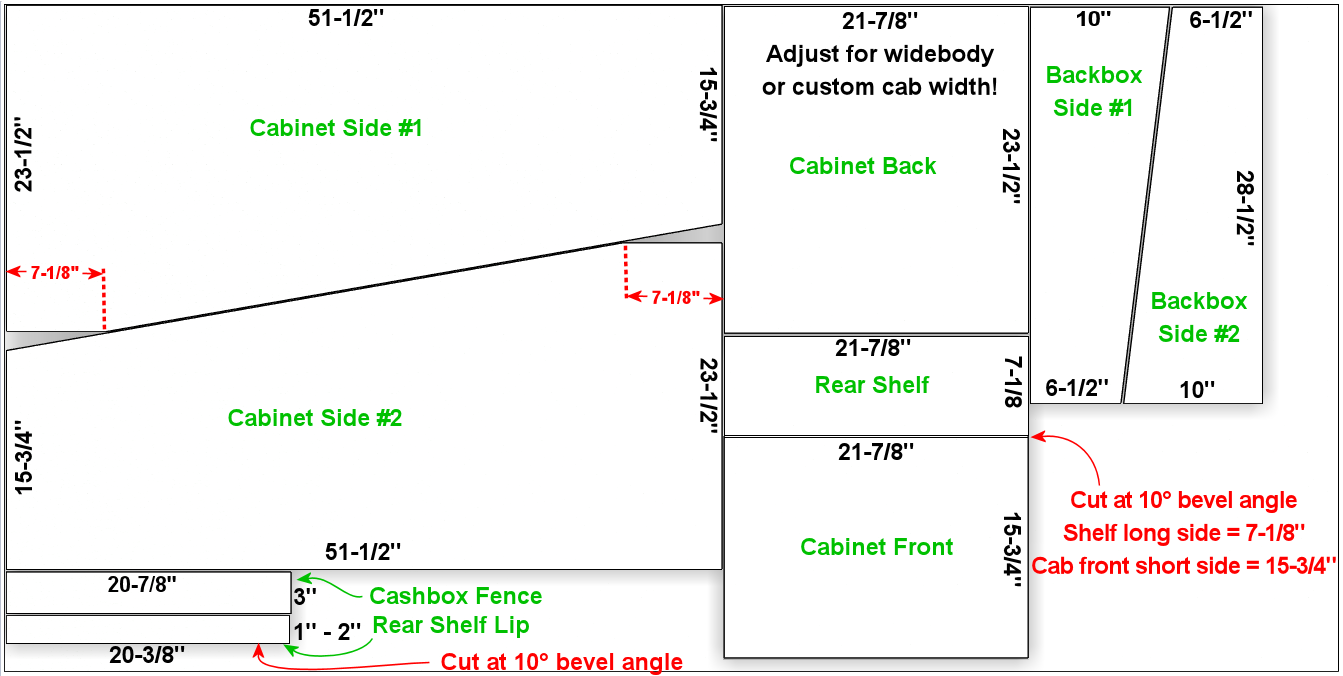
Appendix 10. Cabinet Construction Quick Reference
This section is a quick reference to the woodworking procedure to
construct the main cabinet shell, based on the Williams/Bally
standard-width cabinets of the 1990s (which is also used more or less
unchanged by most newer commercial machines). The plan here includes
plywood cutting dimensions and locations for drills, cutouts, and
routed grooves, and it's organized into a step-by-step procedure that
you can follow.
This is the same plan that's laid out in Cabinet Body, but it's
distilled here to just the essential checklist steps, arranged into an
efficient order of execution. The order of steps makes sure that
dependencies are done by the time you need them, and groups operations
that use similar tool setups, as much as possible, to minimize the
time you have to spend changing drill bits and so forth. The goal is
that you can just go down this list while doing the woodworking and
carry out the steps in order. To keep it concise, there's not much
explanation here, so I've provided links at each step to the more
detailed corresponding material in the main Cabinet Body chapter.
This plan is primarily for virtual cab builders, but it can also be
used to build replacement cabs for WPC-era machines and later System
11 machines, with some small variations. I've tried to point out in
the text where changes are needed for replica cabs.
Corner joinery
The plans below don't specify the type of corner joins to use for the
main cabinet, so they don't include any routing for those joins. You
can do the joinery a number of different ways, each with its own
advantages, so that's left to your discretion. However, the
measurements assume that all of the pieces extend all the way to the
corners of the finished cabinet, which is only true when you're using
one of the mitered joins (such as a simple 45° miter, a locking
miter, or a mitered rabbet). If you're using non-mitered joins, such
as butt or rabbet joins, you'll have to adjust the measurements for
the pieces that don't extend all the way to the finished
corners. References:
- Lock Miter I: The Plywood-Friendly Way - this is the join used in the original WPC cabinets
- Lock Miter II: The Special Router Bit Way
- Cab Body - Joinery
The backbox plans do include specific joinery routing, which is based
on locking rabbet joins.
Width adjustments for different cabinet types
These plans are based on the WPC "standard-body" size, which has an
inside width of 20.5" in the main cabinet. Williams also made
"widebody" cabinets with an inside width of 23.25". You can also
choose a custom width.
To adapt the plans to a different finished cabinet width, you
need to adjust the widths of the following pieces:
- Front wall
- Back wall
- Rear shelf
- Cab floor
Reference: Cab Body - Standard and Widebody
cabinets
The backbox width is typically kept at the same standard size
regardless of the cabinet width.
Mark the panels as you go
As you cut the panels, I think it's a good idea to mark each piece
with the following information, to avoid confusion as you work on
them later:
- Function of the piece ("cab left wall", "backbox top", etc.)
- Inside and outside face
- Top and bottom directions
I just write all of this directly on each piece with a pencil.
Cut the panels
Note: There are other ways to divvy up the plywood, but for the sake of
brevity, we're assuming the "grouped by size" layout here. See
the chapter reference above for other layouts.
Plywood sheet #1 (4' x 8' x 3/4"):
1. Cut the side pieces.
2. Cut the cab, front, and shelf pieces. Note the 10° bevel angle on the
cut between the cabinet front and rear shelf - see Cab Body - Front Wall.
Adjust the width for widebody or custom widths.
3. Cut the backbox side panels.
4. Cut the cashbox fence and shelf lip.
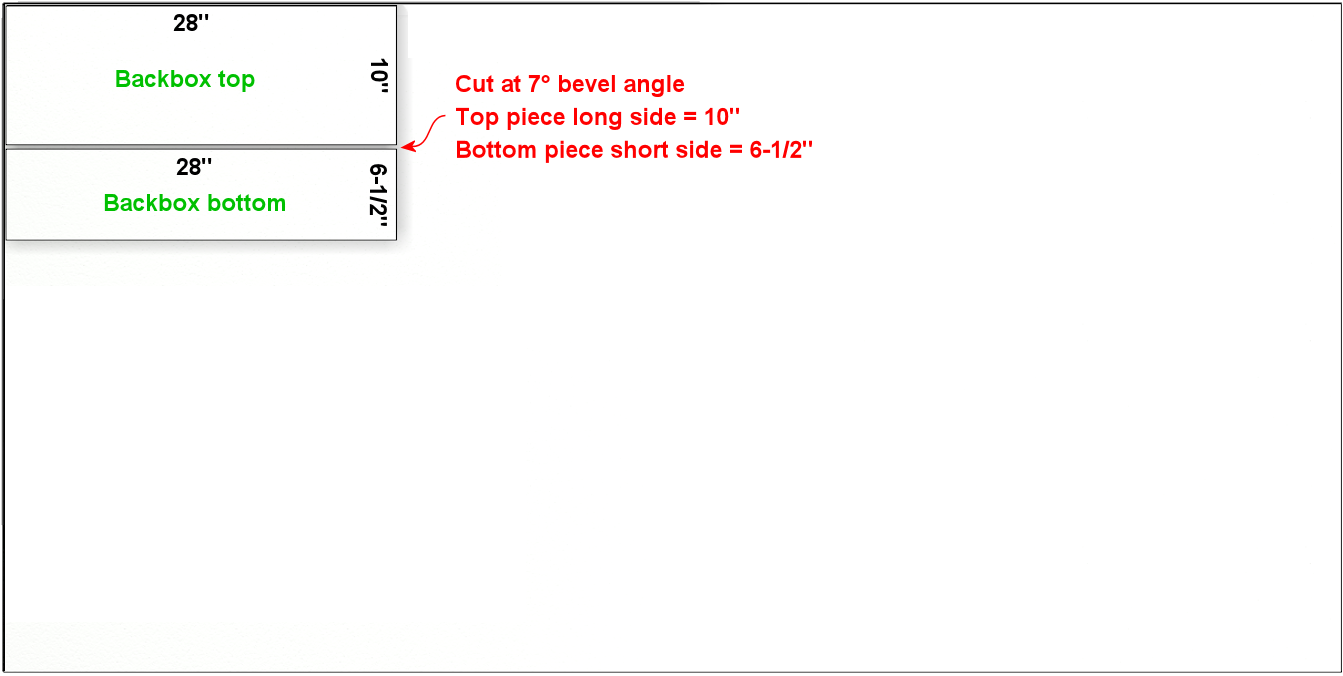
Plywood sheet #2 (4' x 8' x 3/4"):
5. Cut the backbox top and bottom pieces. Note the 7° bevel angle on the
cut between the top and bottom - see Cab Body - Backbox top
and Cab Body - Backbox floor.
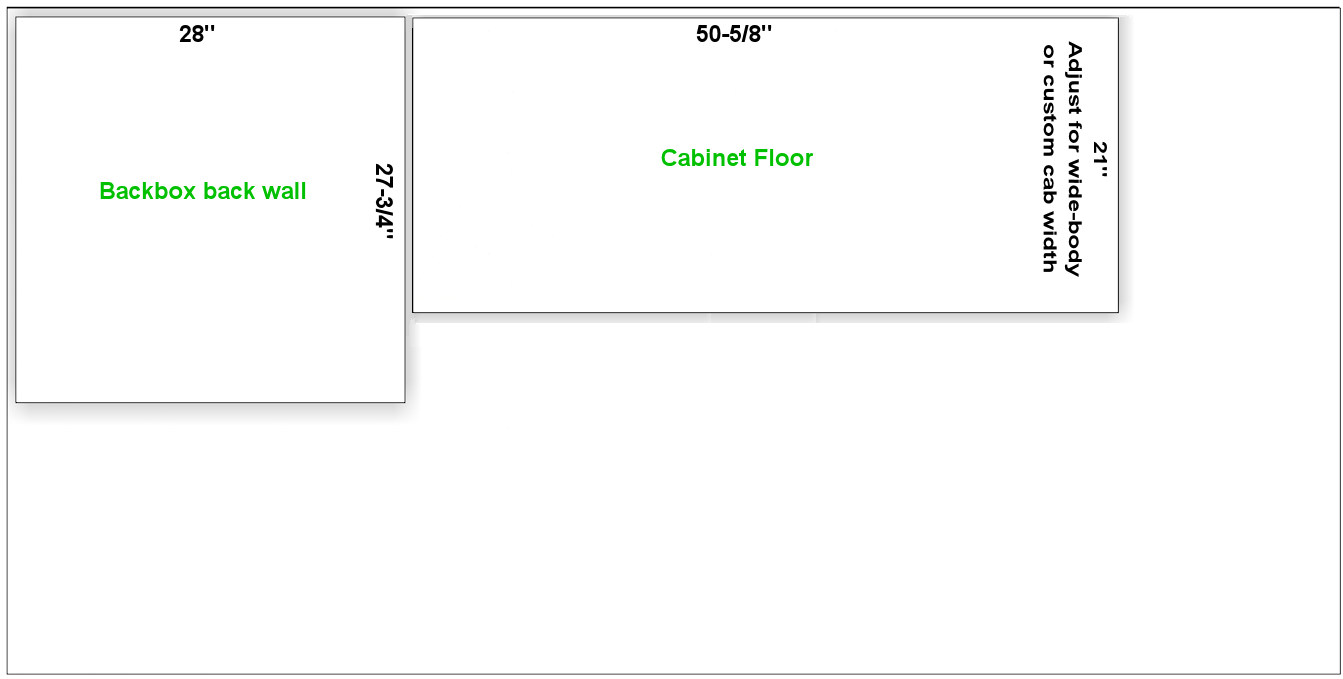
Plywood sheet #3 (4' x 8' x 1/2")
6. Cut the backbox back wall, 28" wide by 27-3/4" tall.
7. Cut the cabinet floor - adjust if you're building a widebody or custom-size cabinet.
Cut the backbox trim pieces
| Quantity | Material | Dimensions |
|---|---|---|
| 2 | ½" plywood | 4¾" x ¾" |
| 2 | ½" plywood | 15" x ¾" |
| 1 | ¾" plywood | 27⅛" x ¾" |
| 2 | ¾" plywood | 12⅜" x 1" |
| 1 | 1x2 board cut to ¾" reducer molding shape (see diagram below) | 27⅛" length |
Reducer molding cross section:
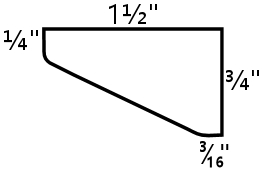
Reference: Cab Body - Translite and DMD guides
Cut the main cab back rails
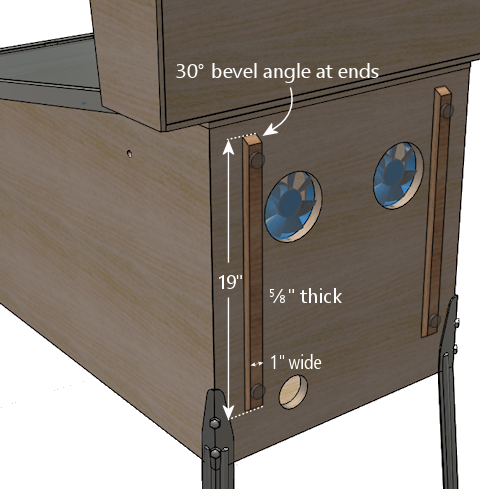
Two pieces of 5/8" thick plywood, 19" long by 1" wide. Cut ends
at a 30° bevel angle. (Substitute 3/4" plywood if
desired.)
Reference: Cab Body - Back rails
Cut the corner braces
Cut a 2x2 board diagonally down its length to form a triangular prism
shape, for corner bracing under the leg brackets and to attach the
cashbox fence. Optionally, you can use similar pieces to reinforce
the joints between the floor and side walls. (Don't use them
with the floor joints with the front and back walls, though, since
those might get in the way of other hardware.)
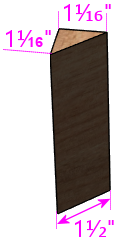
For the front and back corners, the following profile is
required to fit the space under the leg brackets:
Lengths:
- Front corners (leg bracket profile): 6" to 8-1/2" long, quantity 2
- Back corners (leg bracket profile): 6" to 21-1/2" long, quantity 2
- Cashbox fence: 3" long, quantity 2
- Floor braces along side walls (optional): up to 30" long, quantity 2
References:
- Cab Body - Cashbox fence
- Cab Bod - Leg bolt braces
- How to Make Corner Braces (and other wood prism shapes)
Route the top glass guide slots
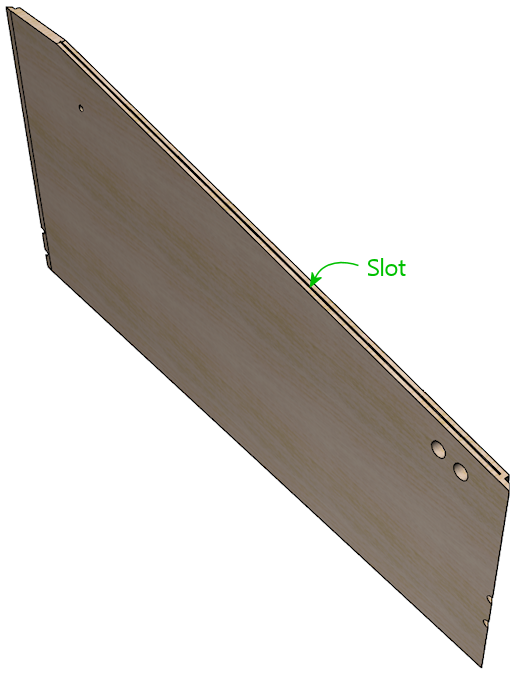
Use a slot cutter router bit, 3/32" slot width, 3/8" slot depth
(Freude part #63-106 or equivalent).
Route the top edge of each side panel, along the slanted section,
centered in the edge. Route from
about 1" from the front to the top of the slanted section.
Reference: Cab Body - Glass channel slots
Mark all routing & drilling locations
At this point, I like to mark all of the panels with the locations of
the routed grooves, cutouts, and drills - essentially everything
below. It's easier to make many of the measurements now, while the
pieces are still whole, and having everything pre-marked makes
the execution much easier.
Cut the corner joins for the main cabinet
Route or cut the grooves and miters for your selected style of corner
joins for the main cabinet. This applies to the main cabinet side,
front, and back walls, at all four corners.
(I prefer to cut the corner joins first, before the floor dados, so
that the dados don't get in the way when you're aligning the cuts for
the corner joins.)
References:
- Cabinet Body - Joinery
- Lock Miter I: The Plywood-Friendly Way
- Lock Miter II: The Special Router Bit Way
Route floor dados
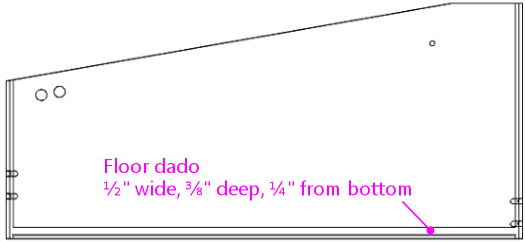
Cabinet sides, front, and back - inside faces.
Route 1/2" wide by 3/8" deep, offset 1/4" from bottom edge.
Note: Some of the 1990s machines I've checked have bottom offsets
closer to 3/8".
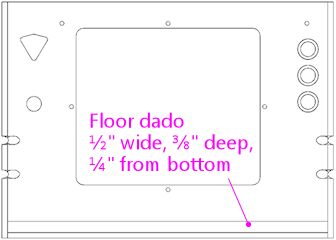
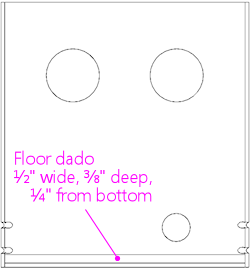
References:
Route the cashbox fence slot
In the right wall only, on the interior face, route a slot 3/8"
wide by 3/8" deep by 3-1/4" high, with the bottom at the floor dado,
and the front edge 11-1/2" from the front (the outside corner).
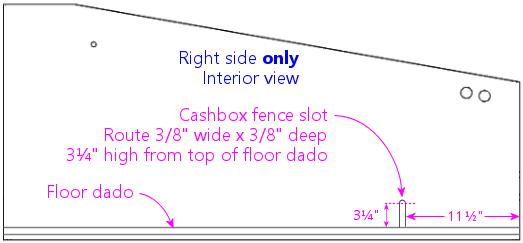
Reference: Cab Body - Side walls
Route the cashbox fence locking tab
Route a groove in the cashbox fence, 3/8" wide by 3/8" deep, flush
with one end.
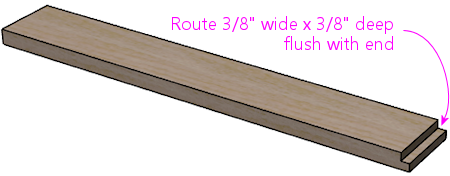
Reference: Cab Body - Cashbox fence
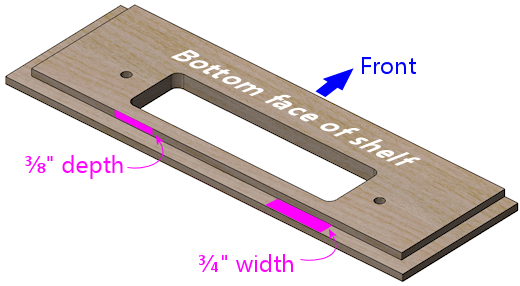
Route shelf bottom dados
Shelf, bottom side
Route 3/8" wide by 3/8" deep grooves at the back, left, and right edges, flush with the edges
Reference: Cab Body - Rear shelf
Route the translite lock cutout in the backbox top trim
In the 27-1/8" x 3/4" x 3/4" backbox top trim piece: route a 2" wide inset,
3/8" deep, centered side-to-side. (Ignore this step if you're not
planning to install a translite lock.)

Reference: Cab Body - Extra routing for translite lock
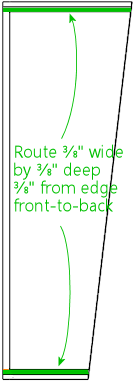
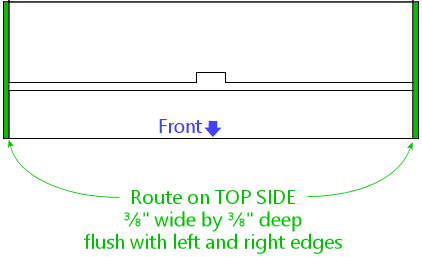
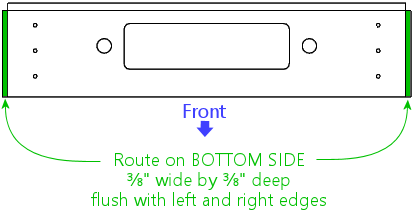
Route the backbox corner joins
Left and right backbox side walls: Route grooves on inside faces, 3/8" wide by 3/8" deep,
offset 3/8" from the top and bottom edges.
Backbox top: Route on outside (top) face, 3/8" wide by 3/8" deep, flush
with left and right edges.
Backbox bottom: Route on outside (bottom) face, 3/8" wide by 3/8" deep, flush
with left and right edges.
References:
Route the backbox back wall grooves
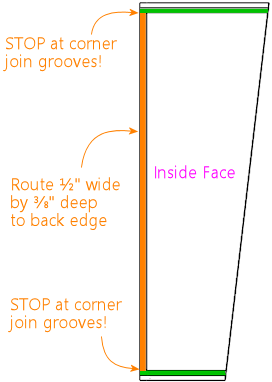
Backbox sides, inside faces: Route 1/2" wide by
3/8" deep, flush with the back.
Important: Only route between the top and bottom corner
join grooves. Only route the orange section as shown below.
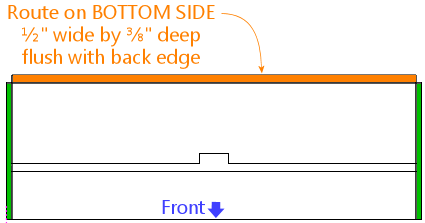
Backbox top, inside (bottom) face: Route 1/2" wide by
3/8" deep, flush with the back.
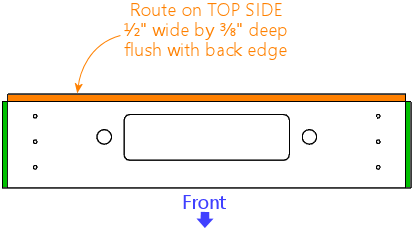
Backbox bottom, inside (top) face: Route 1/2" wide by
3/8" deep, flush with the back.
References:
Route the translite grooves
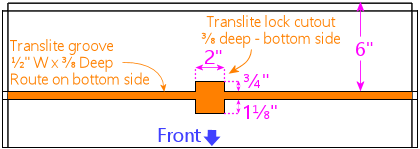
Backbox top, inside (bottom) face:
- Route a groove, 1/2" wide by 3/8" deep, 6" from the back edge, across the whole width of the piece. (The translite fits into this recess.)
- Route a rectangular inset, 2" wide by 2-3/8" tall by 3/8" deep, as shown in the diagram below. (This is for the translite lock.)
Reference: Cab Body - Backbox bottom
Cut the backbox floor cable opening
Backbox bottom: Cut a rectangular opening, 11-1/8" by 3-1/8", as shown
in the diagram.
Note: this lines up with the cable opening in the shelf when the back
edges are aligned.

Reference: Cab Body - Backbox bottom
Cut the shelf cable opening
Shelf: Cut a rectangular opening, 11-1/8" by 3-1/8", as shown
in the diagram.
Note: this lines up with the cable opening in the bottom of the abckbox
when the back edges are aligned.

Reference: Cab Body - Shelf
Test the lockbar fit
The measurements shown below for the coin door cutout and lockbar
bolts are based on the standard equipment, but I've run into some
slight manufacturing variations in the lockbar receivers, so I
like to use the actual receiver I'm going to install as a template
for drilling. That helps ensure that the final fit is closer to
perfect.
Here's the procedure. Place your lockbar receiver against the
inside face of the front panel, and align the two little tabs
on the front so that they're exactly flush with the top edge of the
panel. Mark the locations of the three bolt holes. Remove the
receiver and measure the distance from the top edge of the panel to
the center of the marked bolt hole locations. Compare to the diagram
below:
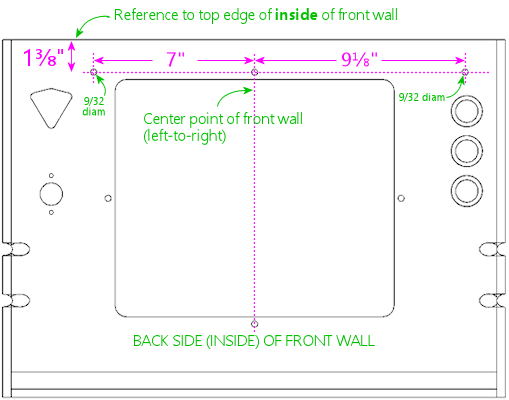
If the position you mark by testing with the receiver differs by more
than 1/32" vertically from the diagram above, I'd use the "test"
positions instead of the diagram locations. You should also adjust
all of the following up or down by the same amount to match, since all
of these pieces fit together when installed:
- Coin door cutout
- Lockbar bolt holes
- Coin door bolt holes
Note that the lockbar receiver is drilled to give you about 1/4"
of play side-to-side, so the horizontal locations don't have to be
as exact.
Cut the coin door opening
Note: see Test the lockbar fit
above before proceeding.
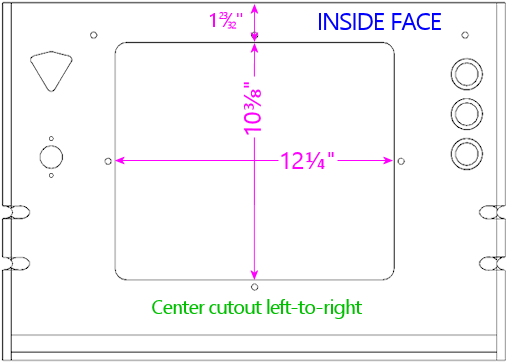
Cut a rectangular opening, 12-1/4" wide by 10-3/8" high, centered
left to right. The top of the cutout is 1-23/32" from the top of
the inside face.
(The distance is specified from the top, because the coin door has
to align with the lockbar receiver, which has to be a certain distance
from the top for the lockbar to fit.)
Reference: Cab Body - Coin door cutout
Cut the plunger opening
Do this only if you're installing a plunger (ball shooter). This
cutout shape only applies to the modern style, 1980s and later.
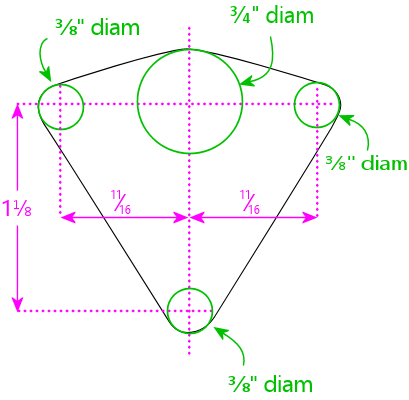
Cutout shape: Drill the four holes on the centers shown, then
route or jigsaw along the perimeter they define (black outline
in the diagram below).
Cutout location: Varies. For virtual cabs,
a location similar to that used in real machines is preferable for
aesthetics, but you can move it if needed to avoid space conflicts
with the TV. For replacement pinball cabs, the location is strictly
dictated by the playfield geometry, because the plunger has to line up
with the playfield shooter lane. The table below lists typical
locations for Williams games of the 1980s and 1990s, but individual
titles may vary, so check against a factory original if possible.
The reference point for all table entries below is the center of the
top 3/4" diameter drill. The location is measured from the top and
right edges of the outside face of the front panel.
| Cabinet Usage | Distance from top | Distance from right |
|---|---|---|
| Virtual pin cab - plunger only, or plunger above Launch Ball button | 2-1/2" | 2-1/8" |
| Virtual pin cab - plunger below Launch Ball button | 5" | 2-1/8" |
| Replacement cab for Williams System 11 and early WPC titles, through 1993 | 1-5/8" | 2-1/8" |
| Replacement cab for later WPC titles, 1994 and later | 2-1/2" | 2-1/8" |
Reference: Cab Body - Plunger and Launch button
Cut the back wall vents
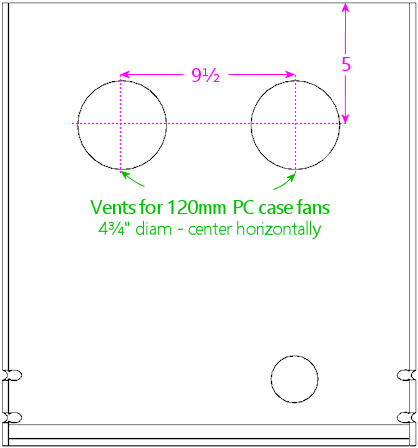
Virtual cabs: For 120mm PC case fans, cut 4-3/4" diameter circular openings.
The exact location isn't critical, so adjust as desired.
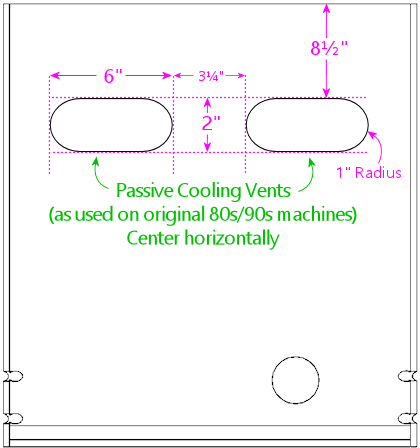
Replacement pinball cabs: Cut two passive vents, 6" wide by 2" high,
with 1" radius rounded ends, as shown in the diagram below. (Use a
2"-diameter hole saw to drill the rounded ends, then cut the
straight edges between the holes with a router or jigsaw.)
Reference: Cab Body - Rear wall
Cut the power button opening
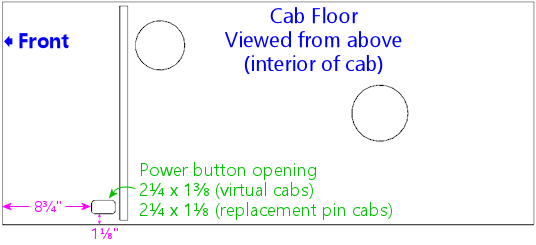
Cabinet floor: a rectangular opening, 2-1/4" long (in the long
direction of the floor) by 1-3/8" wide (virtual cabs) or 1-1/8" wide
(replacement WPC pinball cabs), at the location shown in the diagram.
Reference: Cab Body - Floor
Cut the subwoofer opening
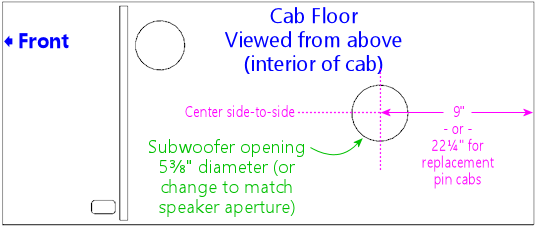
Cabinet floor: circular opening, 5-3/8" diameter, centered
side-to-side. Increase the diameter, if desired, to match your
subwoofer's aperture.
For virtual cabs, the exact placement is up to you, but it's typically
fairly close to the back, to leave a large block of space for the PC
equipment. The diagram says 9" from the back, but this is just a
suggestion.
For replacement WPC cabs, the opening is typically at 22-1/4" from the
back.
Reference: Cab Body - Floor
Cut the floor intake fan opening
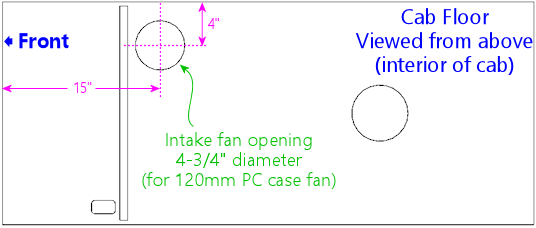
Virtual cabs only (omit for pinball replacement cabs): Cabinet floor,
circular opening, sized to the intake fan (for a standard 120mm PC
case fan, make it 4-3/4" diameter). There's no standard location.
The diagram shows a possible location that should leave enough space
for the PC motherboard. Some people also add a second intake fan
for more air flow, mirrored on the opposite side.)
Reference: Cab Body - Floor
Drill the Launch Ball button
If you're using a Launch Ball button in addition to or instead of a
plunger: In the front wall:
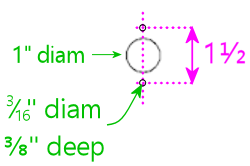
- Drill a 1" diameter hole, for the main shaft of the button
- Drill with two 3/16" diameter holes about about 3/8" deep, spaced 1-1/2" apart, one above and one below; these are for little nubs on the button housing that prevent it from rotating freely
The location isn't critical, other than avoiding space conflicts with
the lockbar receiver, leg bracket, and coin door. Typical placements:
- Launch Ball button only (no plunger): Place the button
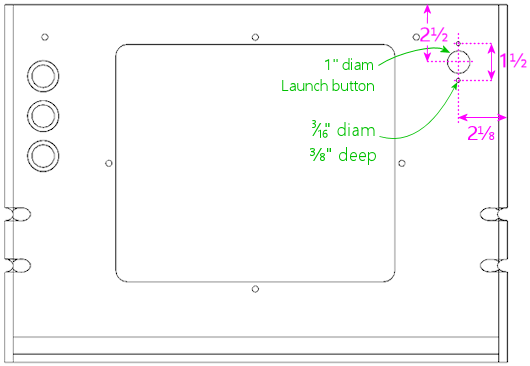
where the plunger would normally go, with the drill center 2-1/2" from
the top edge of the front wall, and 2-1/8" from the right edge.
(This is suitable for replacement cabs for most WPC titles that used Launch Ball buttons instead of plungers.)
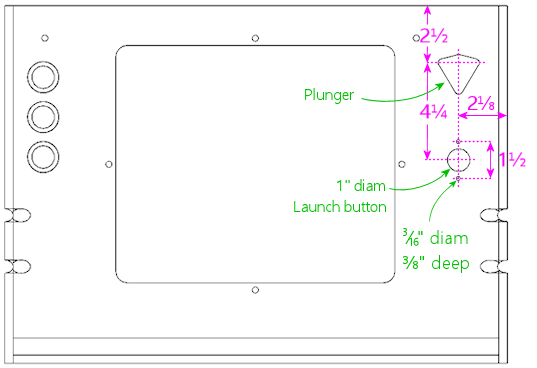
- Plunger + Launch button, plunger on top: Place the Launch Ball button with its center 4-1/4" below the plunger's main drill center.
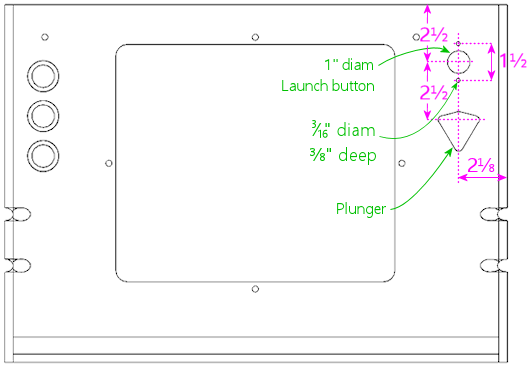
- Plunger + Launch button, button on top: Place the Launch Ball button with its center 2-1/2" above the plunger's main drill center.
Reference: Cab Body - Plunger and Launch button
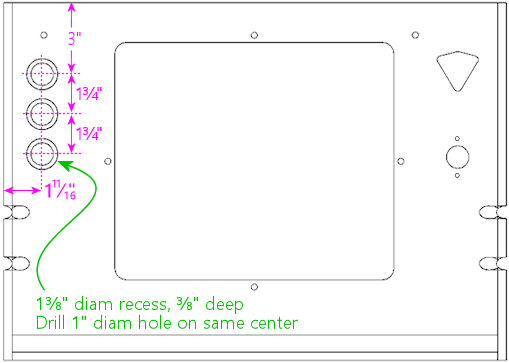
Drill the front panel buttons
For SuzoHapp small round pushbuttons (the standard part used for the Start button on
most machines since the 1990s): Using a Forstner bit, drill a 1-3/8"
diameter inset to about 3/8" depth. Then drill the rest of the way
through on the same center with a 1" diameter Forstner bit of hole
saw.
Placement: For virtual cabs, you can put as many buttons as you like
wherever you like. But the available space limits the options, and
most people end up putting one to three buttons to the left of the
coin door. A three-button layout that fits a standard cab (and fits
with the standard hardware) is shown below. If you use your own
layout, make sure that it doesn't conflict with the lockbar, leg
brackets, or coin door.
For a replacement cab for a real pinball machine, it's best to measure
a factory original and replicate its layout. The buttons might need
to align with other cabinet hardware specific to the title, and/or
with the cabinet artwork.
Reference: Cab Body - Front panel buttons
Drill the lockbar receiver and coin door bolts
Note: see Test the lockbar fit
above before proceeding.
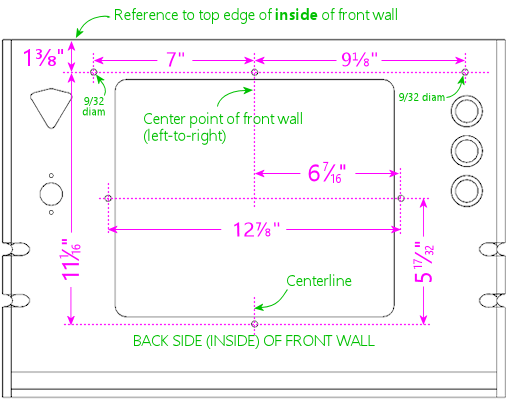
Drill the six 9/32" holes shown in the diagram (three across
the top for the lockbar receiver, and three more around the
perimeter of the coin door).
Reference the vertical position to the inside top edge of
the front panel. Center the middle bolts horizontally in the panel
(this should also be the center of the coin door cutout).
References:
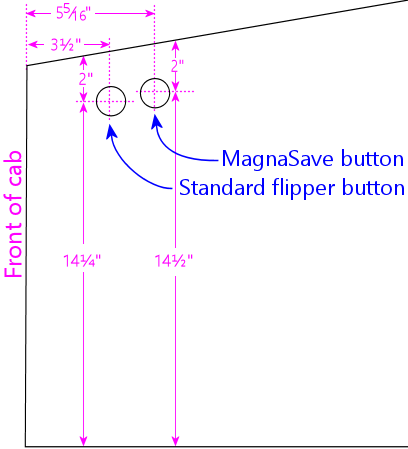
Drill the flipper buttons
For WPC-style side rails (narrow rails that don't cover the flipper
buttons), drill at the locations shown below. The flipper button goes
at the same location whether or not you're including a MagnaSave
button.
For System 11 rails or other wide rails that cover the flipper
buttons, don't use these coordinates. Instead, drill at the same
location as the pre-cut button hole in the rail, using the rail itself
as a template.
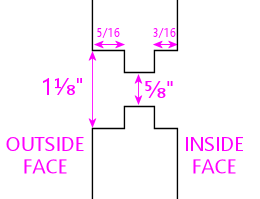
How to drill:
- Original pattern used in most commercial machines (see diagram below):
- Drill a small pilot hole (1/8") on the center, all the way through; use this as the center for all of the remaining drills
- Use a 1⅛" Forstner bit or hole saw to drill a 5/16"-deep depression from the outside
- Use the same 1⅛" bit to drill a 3/16"-deep depression from the inside
- Drill the rest of the way through with a ⅝" bit
- Simplified alternative: If you're using an LED board or VirtuaPin flipper switch bracket, drill straight through with a 1-1/8" diameter hole saw or Forstner bit.
Reference: Cab Body - Flipper buttons
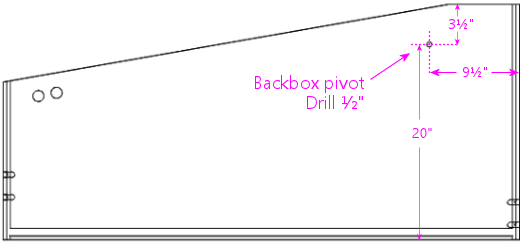
Drill the backbox hinge pivots
Note: You might want to wait until after cabinet assembly to
drill these holes, to fine-tune the positions based on aligning the
backbox perfectly in the final fit. See the Alternative Procedure under
Post assembly: drill the backbox
hinge bolts below.
If you want to pre-drill these holes, drill a 1/2" diameter hole
in each side of the cabinet, 9-1/2" from the back edge and 20"
from the bottom edge.
Reference: Cab Body - Side walls
Drill the playfield pivots
This step applies only to replacement cabinets for Williams/Bally
System 11 and WPC titles. Don't drill these holes for a virtual
cab.
Single pivot nut system (games through mid 1992): The playfield
is supported on a single pivot point on each side wall. The pivot
point in older games (before about 1990) is a steel bushing
(essentially a cylindrical steel spacer), 3/8" inside diameter, 1/2"
outside diameter, that fits over a 3/8"-16 carriage bolt attached from
the outside of the cabinet. The bushing was superseded by a 3/8"-16
threaded pivot nut starting in about 1990, and you can replace the
bushings on older games with the pivot nuts when refurbishing, if
desired.
The location of the pivots varies by title. I've collected
measurements for a few machines listed below. If your specific
machine isn't in the table below, you'll have to find a factory
original to take measurements from. I'd like to expand this into a
more comprehensive list, so if you have trustworthy information for a
machine with a WPC-style cab that's not listed below, please send it
to me.
Be especially careful with these to drill the holes perfectly straight
and to line them up as precisely as possible on the two sides. The
playfield won't seat properly if the pivot nuts are angled
or misaligned.
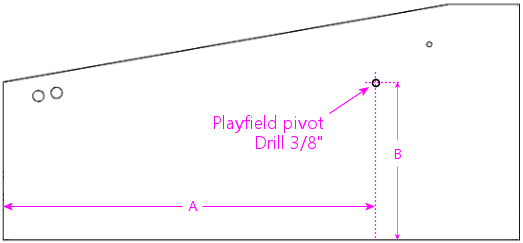
Playfield pivot for machines with single pivot nut. Drill 3/8".
The drills are the same on the left and right sides.
The location varies by title - see table.
A = distance from front corner, B = distance from bottom edge.
Note that A is the distance to the front outside corner of the finished cabinet,
so if you're measuring it before assembly, adjust for joinery. No joinery adjustment is
needed for mitered joins, since the outer face of the panel extends all the way to the
finished corner.
| Title | A | B | Pivot Nut | Carriage Bolt |
|---|---|---|---|---|
| The Addams Family | 36-3/4" | 14-7/16" | #02-4329 (1/2") | 4322-01123-20B (1-1/4") |
| Whirlwind | 36-3/4" | 14-7/16" | #02-4324 (See note) | 4322-01123-20B (1-1/4") |
Note: Part 02-4324 is no longer available from any of the pinball
vendors; it was a steel bushing/spacer with 3/8" ID, 1/2" OD, length
1/2", typically secured with a hex nut. One of the threaded pivot
nuts (02-4329 or 02-4329-1) should work as a substitute.
Slider bracket system (games from mid 1992): This applies to
titles starting with Fish Tales. These support the playfield
on the newer slider brackets (parts A-16637-1/A-16637-2 or
A-17749.1-1/A-17749.1-2), which rest on two 3/8"-16 x 7/8" pivot nuts (02-4329-1)
on each side. The pivot nuts fit over a spacer plate (01-11408) and
mate with 3/8"-16 x 1-1/4" carriage bolts (4322-01123-20B).
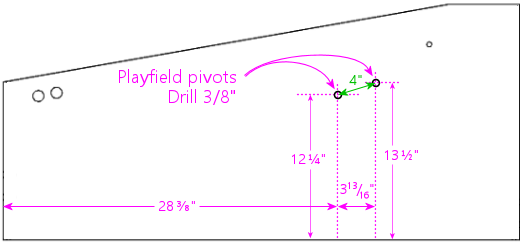
Playfield pivot for machines with single pivot nut. Drill two holes at 3/8".
The drills are the same on the left and right sides.
Note that the horizontal locations are measured from the front outside corner of the finished cabinet,
so if you're measuring it before assembly, adjust for joinery. No joinery adjustment is
needed for mitered joins, since the outer face of the panel extends all the way to the
finished corner.
Note: I think the pivot nut locations are the same for all titles
using the sliders, but I've only verified it against a couple of
machines (Theatre of Magic and Medieval Madness).
Swinks's plans on Pinside make the same assumption, although they
differ from mine on the exact locations of the drills by 1/8" to 1/4".
That might be due to measurement error, manufacturing variations, or
actual design differences in the titles we sampled. (The titles
mentioned in the Swinks thread are Bram Stoker's Dracula,
Creature from the Black Lagoon, and Stern's Iron Man.)
I think the slider system can tolerate this much variation without any
functional impact, but even so, I'd measure a factory original of your
particular title before drilling to make sure it really is in this
range. If you know of a title that's significantly different from my
figures, please let me know so I can include it in this section.
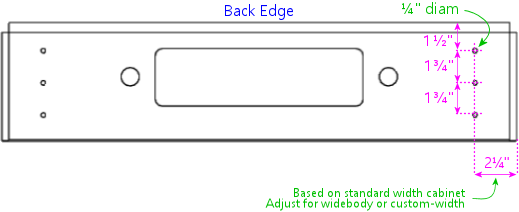
Drill the backbox floor hinge bolts
Note: I prefer to do this after cabinet assembly, by installing
the hinges first, then getting the backbox aligned perfectly, and
marking the bolt locations once everything's in position. This ensures
a perfect final fit. See
Post assembly: drill the backbox
hinge bolts below.
Alternatively, you can do the same alignment the other way around:
pre-drill the backbox floor hinge bolts, and defer drilling the pivot
holes in the main cabinet until after doing a test fit.
If you want to pre-drill these holes, drill three 1/4" diameter holes,
1-3/4" apart, starting at 1-1/2" from the back edge, and 2-1/4" from
the outside left/right edges.
Reference: Cab Body - Backbox floor
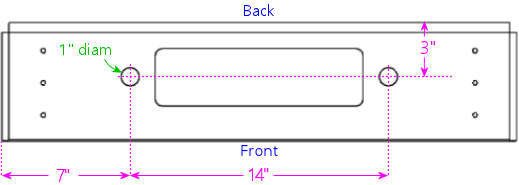
Drill the backbox floor wing screws
Drill two 1" diameter holes in the backbox floor as shown below.
Reference: Cab Body - Backbox floor
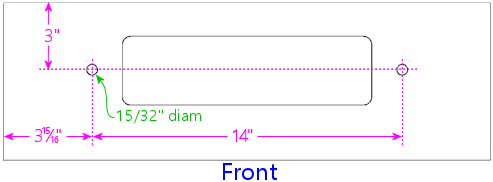
Drill the shelf wing screw T-nuts
Drill two holes in the rear shelf, sized for 3/8"-16 tee nuts
(typically 15/32" diameter), as shown below. Note: these should
line up (on the same centers) with the backbox floor wing screw
holes when the rear edges of the two pieces are flush.
Reference: Cab Body - Rear shelf
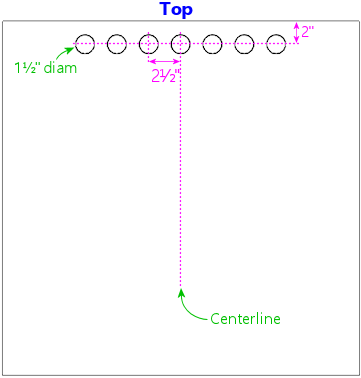
Drill the backbox vents
Drill 7 holes in the back wall of the backbox, 1-1/2" diameter, with
the centers 2" from the top edge and spaced 2-1/2" from center to
center, as shown below.
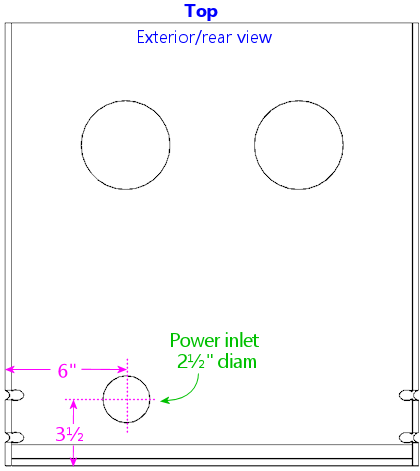
Reference: Cab Body - Backbox back wall
Drill the back wall power inlet
Drill a 2-1/2" diameter hole in the back wall, as shown below.
Reference: Cab Body - Rear wall
Drill the floor vents
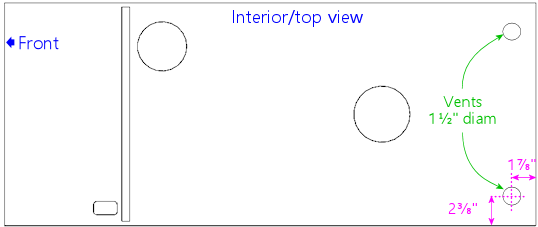
Drill two 1-1/2" diameter holes near the rear of the main cabinet
floor, as shown below. (These are passive air vents for cooling
on the original WPC cabs. You don't really need these on a virtual
cab if you already cut separate floor openings for intake fans.)
Reference: Cab Body - Floor
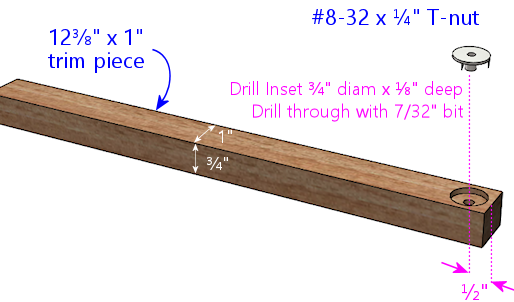
Drill the translite lock T-nuts
If you're installing a translite lock in the backbox, drill holes
for tee nuts in the 12-3/8" x 1" trim pieces as shown below.
Reference: Cab Body - Translite lock plate preparation
Drill the cashbox fence T-nuts
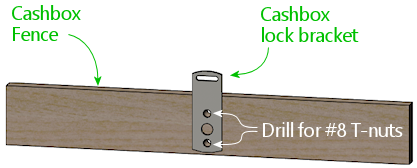
If you're installing a cashbox fence and cashbox lock bracket,
drill holes in the fence for the tee nuts. Use the bracket as
a drilling template, and drill for #8 tee nuts (typically 7/32" to 1/4").
Reference: Cab Body - Cashbox fence
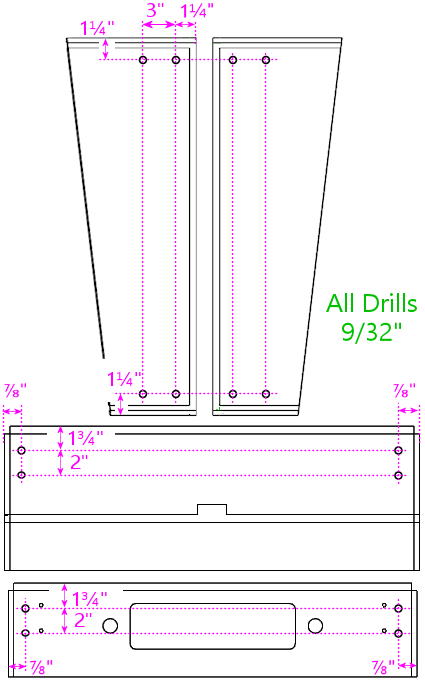
Drill the backbox corner brace bolts
This step only applies if you're using corner braces in the backbox,
Williams part #01-9167, which attach with 1/4"-20 carriage bolts. Drill four
9/32" holes in each of the backbox top, bottom, left side, and right
side panels, as shown below.
Note for widebody/custom widths: the #01-9167 corner braces can't be
used on the bottom corners with a widebody cabinet, because the width
of the cabinet requires the hinge brackets to be placed further apart,
bringing them into conflict with the corner brackets. There's a
special version of the corner bracket for widebody cabinets that fits
over the hinge bracket and doesn't require any additional holes in the
bottom panel. VirtuaPin sells the wide brackets under part number
01-9167-W. (I'm not sure if that's the official part number - I
can't find it listed in any of the Williams parts manuals or for
sale from any of the other pinball vendors.)
For custom-width cabinets that are in between the
standard and widebody sizes, you're likely to have the same conflict,
with no easy way to resolve it, so I'd just skip the bottom corner
braces.
Reference: Cab Body - Backbox corner bracing
Drill the backbox insert panel bracket bolts
This applies only to replacement cabinets for real pinballs, for WPC
and System 11 games that use a backbox insert (the plywood panel with
lamps that sits behind the backglass to provide back-lighting). Don't
drill these holes for virtual cabinets or for later WPC games with
plastic "tub" inserts. These drills are for #10 carriage bolts,
which fasten the insert hinge brackets, parts A-12497 (upper) and
A-12498 (lower), to the inside of the left wall of the backbox. Drill
four 3/16" holes as shown, in the left side panel only.
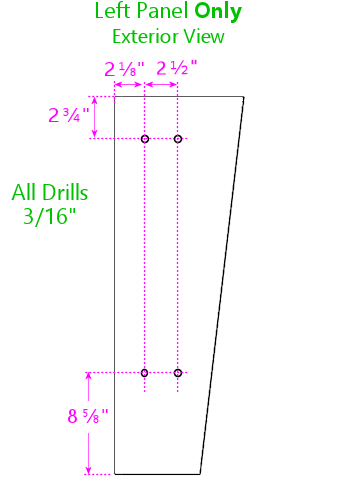
Note: These drill locations are the same on several machines I've
checked, from a mix of System 11 and WPC-95 titles, but I haven't done
an exhaustive survey. If possible, verify the measurements for your
specific title by checking against a factory original.
Post-assembly: drill the leg bolts
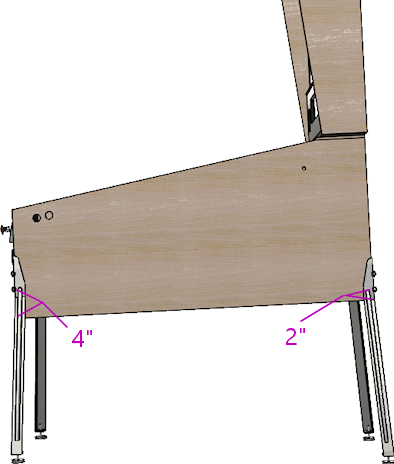
Two 3/8" drills in each corner of the main cabinet, 2-1/4" apart, at
a 45° angle into the corner.
Front left/right: drill centers at 4" and 6-1/4" from the bottom edge
Back left/right: drill centers at 2" and 4-1/4" from the bottom edge
Reference: Cab Body - Leg bolts
Post-assembly: drill the backbox hinge bolts
Attach the backbox hinges to the main cabinet with their pivot nuts.
Set the backbox on top of the cabinet. Center the backbox left to
right, and align the back of the backbox flush with the back of the
cabinet. Secure the backbox in this position with
wing screws, screwing them through the holes in the floor of the
backbox and into the matching T-nuts under the shelf.
Rotate the hinges up so that they sit flat against the bottom of the
backbox, and mark the locations of the three bolt holes. Do this for
both sides. Before marking positions, make sure that the hinges are
parallel to the sides of the cabinet, and make sure there's enough of
a gap that they won't rub against the sides when the backbox is
rotated.
Remove the backbox and drill 1/4" holes at the marked positions.
Alternative procedure: Drill the six bolt holes in the backbox floor
first, but do not drill the pivot bolt holes in the cabinet
sides yet. Attach the cabinet hinges to the backbox with six carriage
bolts (1/4"-20 x 1-1/4") and whiz flange nuts (1/4"-20). Position
the backbox on top of the main cabinet as described above and secure
it with wing screws. Mark the hinge pivot hole positions on the
sides of the cabinet. Remove the backbox. Drill a 1/2" diameter hole
on each side of the cabinet at the marked position.
References:
